Users are 3X times more likely to prefer a tutorial video over reading a product’s instructions.
Marketers and web-developers would be served to think like other service providers, and give their customers what they clearly want.
The primary goal of a tutorial video is to enable the user to accomplish a task successfully, and all elements need to be aligned to achieve that goal.

Making screencast videos is the easiest way to start out. As you start improving your skills, you can think about creating other videos too, such as talking head videos where you show your face and explain a concept ‘live’. In this post, you’ll find helpful tips for creating a successful tutorial video.
1. Select the right tools
Using the right tools is essential if you want to create a quality tutorial video.
Use the right microphone
If you want to record screencasts on a regular basis, it’s a good idea to purchase a USB microphone rather than using your computer’s built-in microphone. Using the built-in microphone often results in a muffled sound.
Audio quality matters when creating tutorial videos. If you want to go all out to reduce sibilance (i.e. hissing sounds) and vocal popping, you can use a pop filter on your external microphone.
Select screencasting software
Screencasts are a great option for tutorial videos. This is a recording of your screen, done with screencasting software. Using this type of software enables viewers to follow your process step-by-step while hearing your explanations.

A great screencasting software option is RecTrace if you’re using Windows or Mac. It’s an excellent free screencasting software products with all the latest screencasting features.
2. Choose the right recording location
Try to record in a space with good acoustics, devoid of too many background sounds. You don’t want viewers to hear echoes and background noise when listening to a tutorial.
Everything displayed on your computer’s monitor will be recorded when doing a screen capturing session so make sure that all your private data is outside of the space.
Save time by controlling the environment during production, rather than trying to edit extensively post-production.
3. Rehearse before recording
Once you’ve prepared your working environment and attached the external microphone to your computer, it is time to start practicing. How you speak matters when you’re creating a tutorial. You will need to make sure you’re not speaking too quickly or coming across as dull, impatient or tired.

Most studies show that users prefer to hear a human voice as opposed to an unnatural computer-generated version for tutorials. However, you need to articulate slowly and carefully because not all viewers will be familiar with your accent.
At the same time, you need to maintain an active pace using tonal inflections. If your speech is monotone, it will kill any enthusiasm to learn.
Experiment with the microphone to make sure you’re holding it in the right position. You want your speech to sound as natural as possible, rather than as if you’re reading straight off a script.
Study and take notes to prevent any mental blocks during recording. You need to be able to explain every detail of a technique to your audience without too many unexpected occurrences, such as a window you didn’t expect popping up while recording.

4. Keep tasks simple and clear
If you write down a plan before recording, it helps you to stay focused and clear. Begin by stating the purpose of the video. Your audience should understand immediately what you are going to talk about. Follow up with the precise steps required to achieve the goal:
- Have a clear beginning, middle, and end: This is a basic rule of storytelling that guides the viewer through the information.
- Steps should be logical, and any information not essential to the completion of the task should be left out.
- Use active voice rather than a passive voice for instructions and make sure the language you use is suited to your audience.
- Larger tasks should be broken down into subtasks: Try to find natural stopping points – including too much information in one video creates cognitive overload. By offering just the right amount of information in each video, you’re giving the viewer time to process it.
- You can cover more than one topic in a video but make sure all the topics have something in common.
5. Think about your viewers
Viewers should have as much control as possible to enable them to absorb information at their own pace. You should be able to use all the standard video control buttons including starting, stopping, pausing, and replaying of segments. They should be able to easily control volume, skip information they already understand and replay more complex segments.
Visual teaching aids, such as adding circles around objects on the screen, makes it easier for users to connect images and spoken words.

Viewers are more likely to remember your tutorials if you add some personality.
You don’t have to try and be humorous – it can be enough to add extra information viewers were not expecting. If you’re giving them the information they want, just being yourself and talking casually and naturally will help you to build a loyal audience.
6. Edit post-production
Add annotations, chapters and closed captions: Don’t hesitate to add any elements that will make viewing easier and more enjoyable. Most video editing software products provide effects that can make your video tutorials more visually attractive. Chapters are especially effective when your video runs longer than a minute or two. Viewers can click on them and jump to the parts of the video most relevant to them.
Create your video title: You want to teach viewers how to do something, and it’s important to craft your title carefully if you want them to find your video. If you’re not sure about your title, you can’t go wrong by starting with “How to..”
Optimize your video description: Using keywords in your video description related to the topic your video covers will secure better search results. Google AdWords Keyword Planner Tool can help you to discover the best keywords for your video tutorials.
7. Upload your tutorial video to the right platform
Uploading your video to YouTube will expose your tutorial videos to a wide audience. However, free comes with a price. Your tutorial will likely contain information you may not want to become readily-available to just anyone. Additionally, those watching your video on YouTube will more than likely be recommended similar content, typically promoting your competitors. Facebook and Vimeo present similar challenges. eLearning websites, such as Skillshare or Udemy are worth considering if your plan is to produce video tutorials on a professional level.

Using a video hosting platform for all your tutorial videos offers a number of benefits; some of which are driving traffic to your own website rather than to YouTube, being able to customize your videos and access to comprehensive analytics.
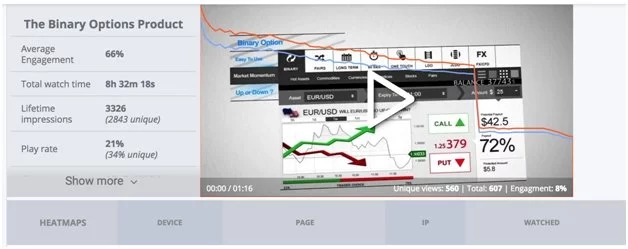
8. Use analytics to track viewer engagement
Your first tutorial may not attract millions of viewers. Tracking the number of views, paying attention to comments and using analytics to determine viewer behavior will help you to see where you can improve.
Nobody creates the perfect video when first starting out. Using analytics on a video hosting platform like Cincopa helps you to understand how viewers are responding to your videos.
For example, if you see that many of them start falling off at a certain point in your video, you know that you need to find out why and make changes.

Conclusion
Creating high-quality tutorial videos requires more work than preparing to teach a live class. You need to choose the right tools, find the right location, practice and much more to create high-quality videos that offer a great learning experience. It’s best to start simply by using screencasting software and then add to your repertoire as you develop your skills.