This guide will provide you with the information you need to create a Cincopa module within Hubspot so that you can quickly and easily add your Cincopa galleries into your Hubspot webpage
Hubspot can be a valuable marketing and lead generation tool as well as an in-depth website design platform.
Getting Started
- Log into your Hubspot account and navigate to Marketing –> Files and Tools –> Design Templates
Creating and editing Modules
In the design manager tool within Hubspot, you can create custom coded modules to add custom or advanced features to your blog, pages, or emails. The module editor has three editor panels for writing HTML and HubL, CSS, and JavaScript. Custom modules offer a wide range of functionalities so that content can be fully customized within the page, email, or blog editor.
Create a new module
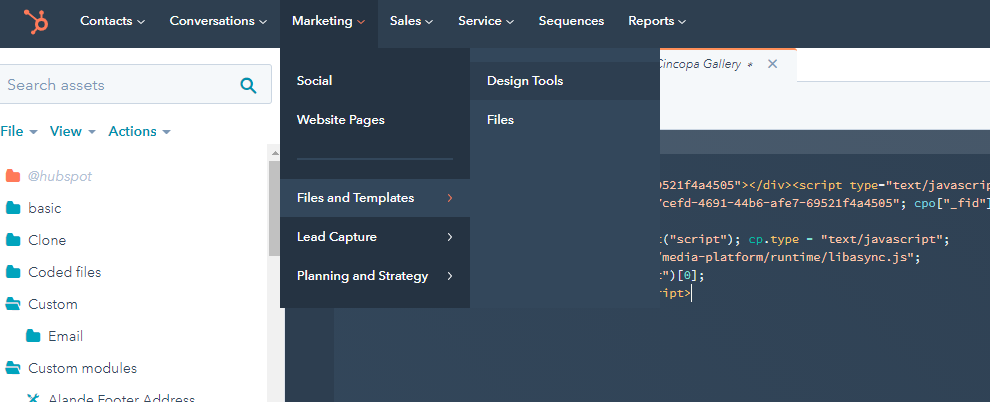
- In your HubSpot account, navigate to Marketing > Files and Templates > Design Tools.
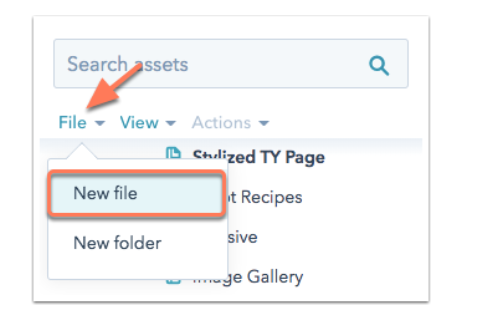
- At the top of the finder, click the File dropdown menu and select New file.
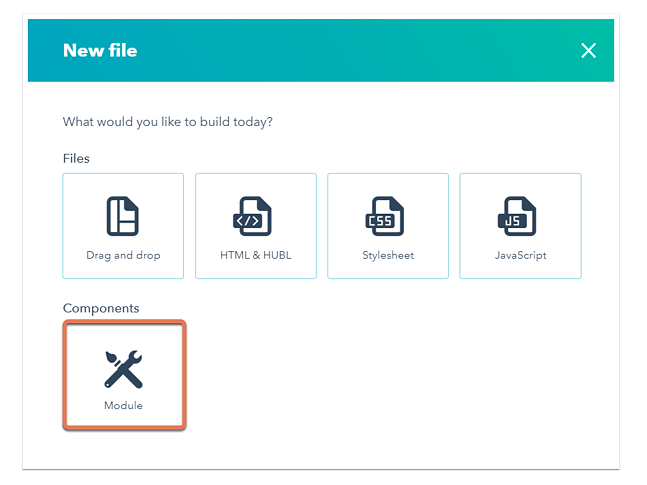
- In the dialog box that appears, select Module.
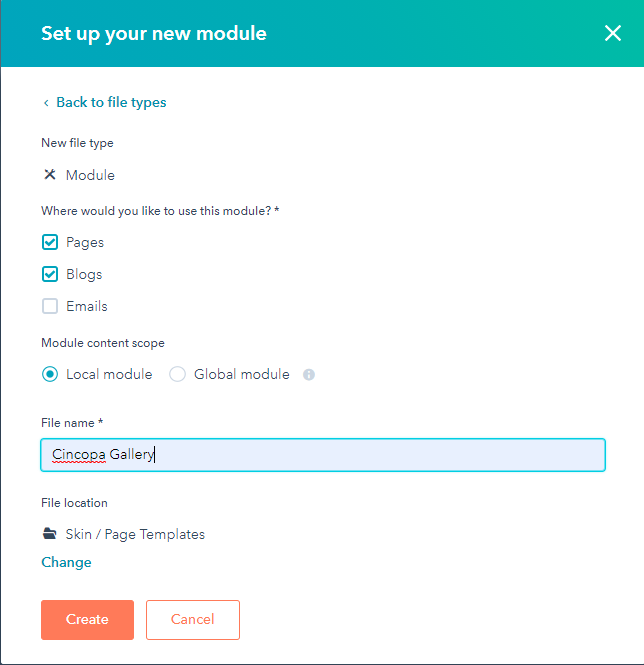
- Select page templates and blog templates.
- Select the local module option.
- Give the module a file name, we recommend naming the module ‘Cincopa Gallery’ then click Create.
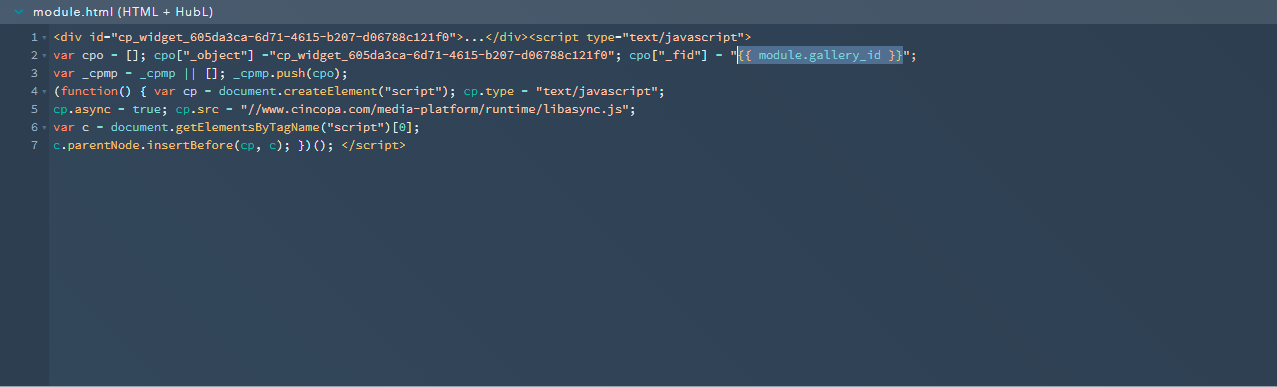
Copy You Cincopa gallery embed code into the Hubspot module
- Once the Module has been created we are going to copy our Cincopa embed code into the Hubspot module (HTML + HubL) Design window

- Copy the embed code from your Cincopa Gallery
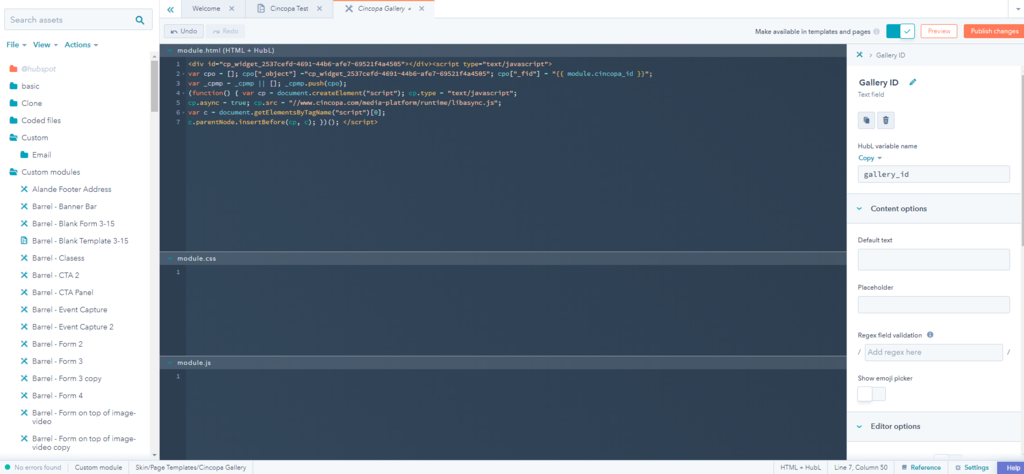
- Paste the code into the HTML + HubL module window
Add fields to your module
- In the module inspector on the right, click the Add field dropdown menu in the Fields section, then select a field to add to your module.
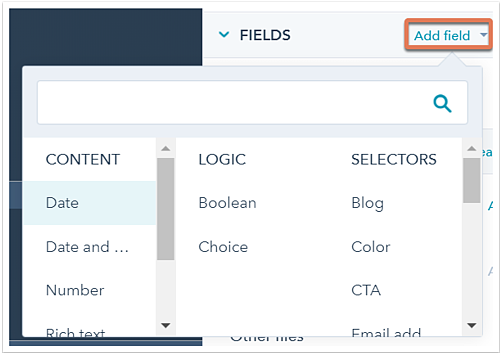
- Use the ‘TEXT‘ option under Content, you will need to scroll down to find it.

- Label the text field ‘Gallery ID‘, leave all other settings at default.
- Under the HubL variable name under Gallery ID we are going to select ‘Copy‘ and choose ‘Copy value only‘
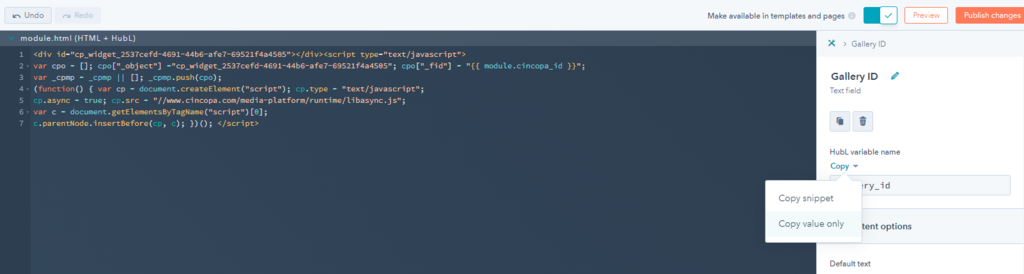
- Next we are going to replace the ‘FID’ in the Cincopa embed code with the value we copied
**Don’t forget to publish your changes!**
Adding your new Cincopa module to a new or pre-existing template design.
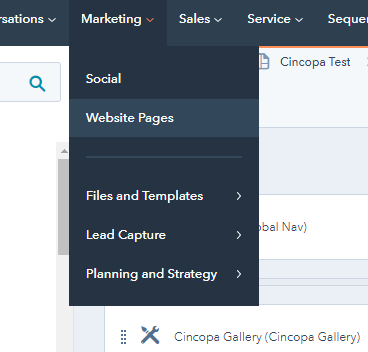
- Navigate to the page you wish to add the module to by selecting Marketing –> Website Pages and select the page.
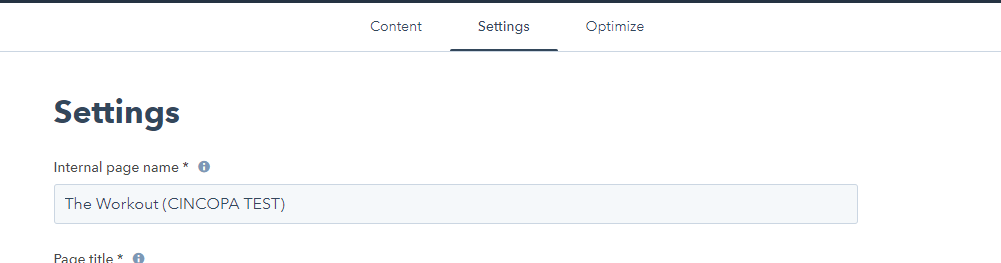
- The page will open and by default you will find yourself on the ‘Content‘ page. You will want to navigate to the ‘Settings‘ page.
- Scroll down and expand the Advanced Options menu. Continue to scroll down once the advanced options menu is expanded and you will find the option to ‘Edit this template‘
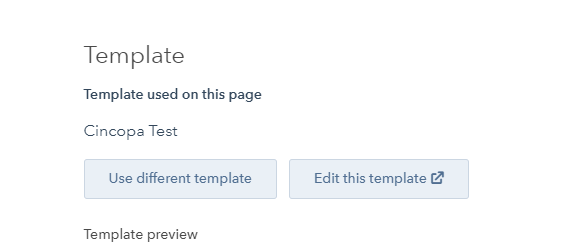
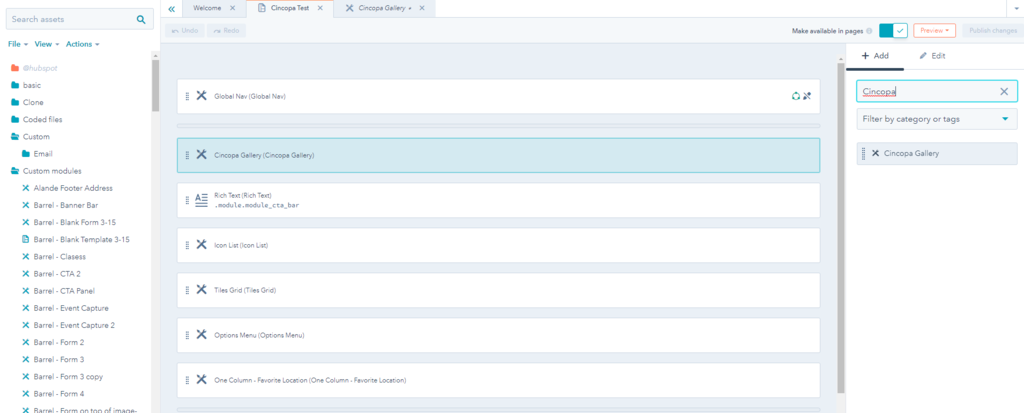
- Select ‘Edit this template‘ and a new tab will open and take you to the design manager for your page.
- Once the design manager is open you will want to select the ‘Add’ option in the upper right hand corner of the page.
- Search for ‘Cincopa’ (the name that we applied to the module earlier in this guide) to quickly locate the new module.
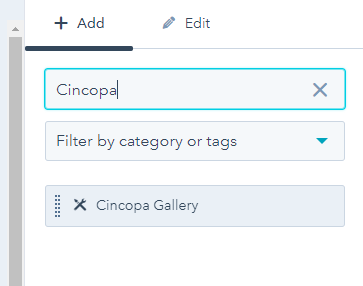
- Click and drag the new module onto your template in the position that you wish to have it in. (You can re-arrange the modules at any time)
- Next we will want to select the ‘Publish Changes‘ option in the upper right hand corner of your screen.
- Once the changes have been published we will want to navigate back to our page by selecting Marketing –> Website Pages and choosing the page in question.
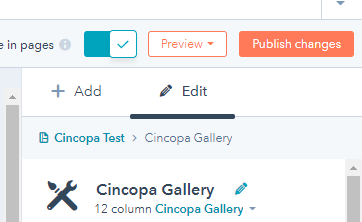
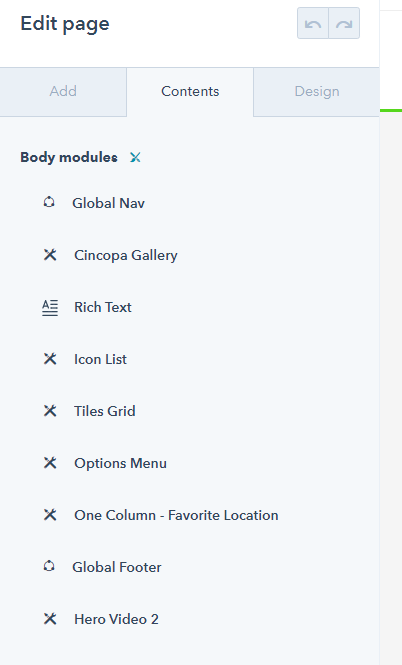
- Select the page that we added the new Cincopa Gallery module to, and you will now see ‘Cincopa Gallery‘ in your module list.
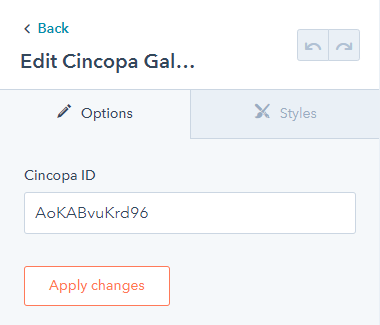
- Click on the ‘Cincopa Gallery‘ module and you will be presented with a text box where you can enter in the Cincopa Gallery ID from any of the galleries you have created in your Cincopa profile. (This Gallery ID will need to be collected from your Cincopa Profile so you will need to navigate there to find it)
- Once the Gallery ID has been added and the page saved, the corresponding Cincopa gallery will appear in the area that you have designated on your webpage.
Locating the Cincopa Gallery ID through your Cincopa profile
- Navigate to Cincopa.com and log-in to your profile
- Select the ‘Galleries‘ option in the upper left hand corner of your profile.
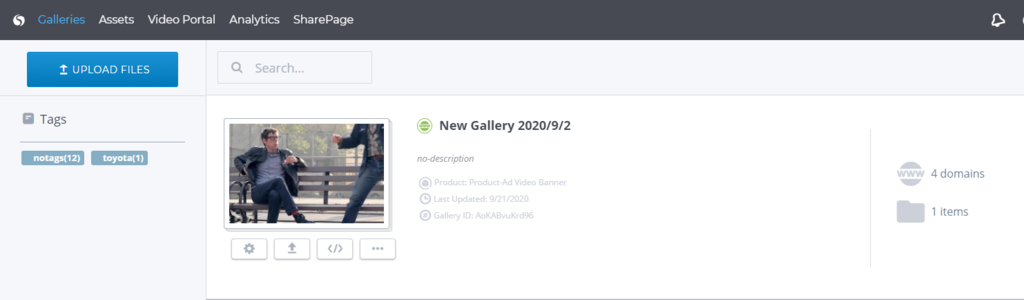
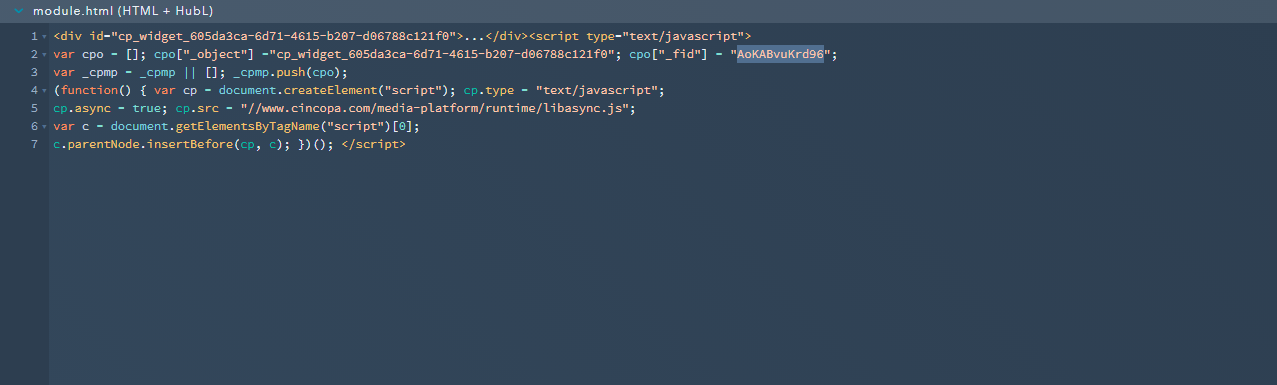
- Each Cincopa Gallery has a unique Gallery ID. We can see the that ID for the first gallery is AoKABvuKrd96.
- Copy this code and paste it into the Cincopa ID text window that is now available in your new HubSpot module.
- Once the Gallery ID has been entered you can save your changes and re-load the page. The attached Cincopa Gallery will now be available for viewing!
- Any updates to the gallery through your Cincopa profile will automatically be reflected on your HubSpot page. Give the system a few minutes to process the cache after making changes.
Remember to save your changes!
If you require any additional assistance with Cincopa integrations please don’t hesitate to visit our Knowledge Center by following this link.