Find out how to screenshot important data on the most popular desktop and mobile devices.

Screenshots have always been hugely popular. They’re often the fastest, simplest way to get information from one application to another.
With a few screen taps or a quick keyboard shortcut, you can capture important data and send it on its way. With screenshots, there’s no need to worry about configurations or share settings – the picture looks exactly the way your screen does.
Every device and operating system in use today allows you to take a screenshot directly from your device. However, not every device does screenshot the same way. In fact, even different versions of the same device can have different screenshot key commands.
How to Take a Screenshot on PC and Mobile
We’ve compiled a handy list of every screenshot key command for all the most popular devices. Read on to find out how to take a screenshot on yours:
01. How to Screenshot on Mac
Apple released a Screenshot app with its Mojave operating system in 2018. Every Apple computer released since then has this app.
To take a screenshot on Mac with OS Mojave and above you just need to access the Apple Screenshot app by pressing Shift-⌘-5 and the app will open.
You will see a command bar that offers various screenshot options. You can take screenshots of the entire screen, a portion of the screen, or a specific window. The Screenshot app will also let you record videos of any part of your screen.
The app includes an Options menu. You can choose where you want the computer to save your screenshot or set a short delay between screenshots here.
Also, if your Mac has a Touch Bar, you can take a screenshot of its contents by pressing Shift-⌘-6.
How to Screenshot on Earlier Versions of Mac OS X
If you aren’t using the latest version of Mac OS X, you won’t be able to use Apple’s Screenshot app. You can still create screenshots with Mac OS X High Sierra (10.13) and earlier using the following key commands:
To take a screenshot on Mac of the entire display, press Shift-⌘-3.
- To take a screenshot on Mac of only part of your screen, press Shift-⌘-4 and then drag your cursor over the area you wish to capture.
- To take a screenshot of a specific Mac window, press Shift-⌘-4, then the Spacebar. Click on any window and the system will save a screenshot of that window.

Since earlier versions of Mac OS X don’t include a dedicated screenshot app, you won’t be able to specify a particular save location or file format. The system will automatically save the screenshot as a .PNG and place it on your desktop.
02. How to Screenshot on iPad
Every iPad has screenshot capability. iPad users can capture the contents of their screen using the physical buttons located on the device.
All iPads except the 2020 iPad Pro have a Home button on the front. The best way to take a screenshot on an iPad is to simply hold the Top (Power) button, and then push the Home button before releasing both. The device display will flash briefly, and a screenshot will appear in your Photos app.
Since the 2020 iPad Pro doesn’t have a Home button, the process is slightly different. To take a screenshot on a 2020 iPad Pro, you have to hold the Top button and push the Volume Up button before releasing both. The screen will flash and your new screenshot will be in the Photos library.

How to Screenshot on iPad with Assistive Touch
Apple designed its iPad with convenience in mind. Users who cannot press multiple buttons at the same time can still take screenshots on the iPad using its Assistive Touch technology.
To do this, you must first enable Assistive Touch:
- Go to Settings > General > Accessibility > AssistiveTouch
- Swipe the toggle right to enable it. The toggle should turn green.
Once Assistive Touch is enabled, you will see a new menu button show up on your iPad’s screen. Tap on this button to open up a menu. Tap on Device, and then More. Tap Screenshot.
You will see the iPad screen flash for a moment and emit a low-volume camera shutter sound. Your screenshot (minus the menu you opened) will show up in your Photos app.
How to Screenshot on iPad with an Apple Pencil
The Apple Pencil is an incredibly useful tool for graphic designers, creative professionals, and everyday iPad users of all kinds. Apple Pencil users can quickly snap screenshots of their work without having to put down their device or push any buttons.
To take a screenshot on the iPad using an Apple Pencil, simply swipe the stylus from the bottom corner of the display to the center. It doesn’t matter if you swipe from the lower-right or lower-left corner.
Once you do this, you’ll see screenshot editing tools show up on-screen. You can make notes, highlight sections, or edit parts of the screenshot before saving it to your Photos app.
03. How to Screenshot on Windows 10 PC
Windows computers offer users multiple ways to take screenshots of display contents. These devices have a special keyboard key labeled PrntScn or something similar.
This keyboard key is usually located at the top of the keyboard, near the Function keys. Some manufacturers place it on the lower right corner, under the Question Mark key. In both cases, to take a screenshot on windows 10 pc, just press the PrntScn key to save the current screen on your clipboard and you may then paste the image into an application like paint by pushing Ctrl-P.
Windows laptops often include a Fn key that enables command functions for certain keys, including Prntscn. Windows 10 laptop users may have to hold down the Fn key and then press Prntscn to take a screenshot of their display.
Windows includes several key command variations for Prntscn:
- To screenshot the active window to your clipboard instead of the entire screen, press Alt-Prntscn.
- To screenshot a portion of the screen, hold the Windows Key down, then press Shift-S. This only works on the latest version of Windows 10.
- To save the entire screenshot as an image file in your Pictures folder, press the Windows Key and Prntscn at the same time.

04. How to Screenshot on HP Laptop
To capture a screenshot on HP laptops running Windows 7, 8, or 10 you can use the snipping tool. The snipping tool allows users to select a portion of the screen and create easy screenshots.
The Snipping Tool is an application that lives in your start menu. You will have to select and open it to take a screenshot.

Once you’ve opened the application, select New or press Ctrl-N to make a new snip. Your cursor will transform into a small crosshair. Drag this crosshair over the portion of the screen you’d like to capture and then press the disk icon to save the screenshot.
The snipping tool comes with multiple modes:

- Free-form snip captures any shape as a screenshot. You can create circular screenshots, figure-eight screenshots, or more complicated shapes by dragging the mouse cursor accordingly.
- Window Snip creates a screenshot of your active window with a single click. There is no need to drag the cursor over a particular section.
- Full-screen Snip captures the whole display. If you have multiple displays attached, it will capture both displays at once.
05. How to Screenshot on Dell Laptop
Very much like a PC, to take a screenshot on Dell laptops that run Windows 7, you can use the Prntscn button to copy screenshots to your clipboard. From there, you only need to paste the screenshot to another application, like Paint.
Windows 8 users will also need to hold the Windows Logo key to take a screenshot. The command is Windows-Prntscn. It will save a screenshot directly into your Pictures folder.
Some Dell laptops do not feature a Prntscn key. On these computers, users must press and hold the Fn and Insert keys for this purpose. It will create a screenshot of the entire screen and save it to your clipboard. You will have to paste the screenshot into a photo editing application like Paint.
In addition to this special key combination, Dell computers without a Prntscn key can still take screenshots using the Snipping Tool.
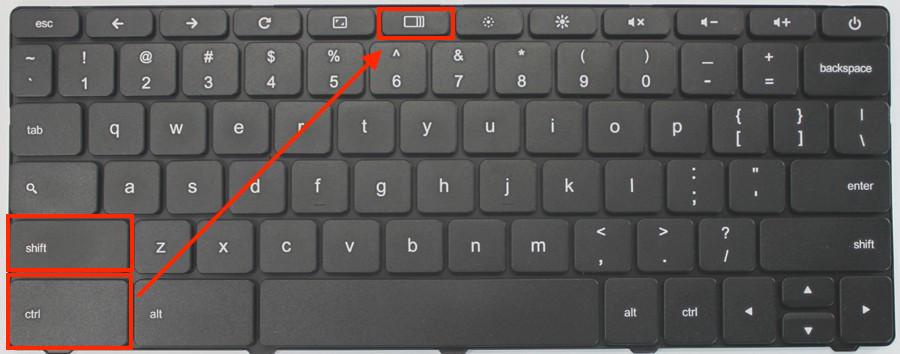
06. How to Screenshot on Chromebook
Chromebooks are low-cost laptops that run Google’s Chrome operating system. Since these laptops run Chrome OS instead of Windows, taking a screenshot requires a different set of key combinations.
The simplest way to take a screenshot on Chromebook is by holding the Ctrl button and pushing the Show Windows button. Show Windows is in the top-center of the keyboard, where F5 would be on a Windows PC keyboard.
Chromebook users can use alternate keyboard shortcuts to change screenshot functionality:
- To take a partial screenshot, hold Shift and Ctrl before pressing the Show Windows button. Click on the screen and drag a box around the portion of the screen you’d like to capture.
- To take a screenshot in tablet mode, press the Power button and the Volume Down button at the same time.
Chromebooks deposit screenshot images in the device’s Downloads folder. To access it, you must access the Files app, the default file manager on Chrome OS.
Screen Recording
Apart from screenshots, screen recording can also be a handy tool to capture important data on your Mac, Windows, or Chrome device. Instructions or tutorials can be stored via capturing your screen and saved for future references. Most devices nowadays come with their native screen recording application but a universal chrome extension like RecTrace can record screens with audio/video capabilities and is free to install.
How to Screenshot on Mobile
Mobile devices fall into two general categories. Android devices include more than 24000 different mobile devices made by 1300 different brands running Google’s Android operating system. iPhones are made exclusively by Apple and run Apple’s iOS operating system.
07. How to Screenshot on Android
Generally, every Android manufacturer chooses its own screenshot command for its devices. The most popular method to take screenshots on an Android device is by holding the Power and Volume Down buttons together.
Huawei, Xiamoi, and Oppo phones all work this way. Market leader Samsung also allows users to take screenshots by holding the Power and Volume Down, but supports additional gesture-based commands as well.

Samsung users can enable Palm Swipe to Capture in their phone settings. To take a palm swipe screenshot, position your hand perpendicular to the phone, as if you were to karate chop downwards into it. Slide the entire length of your hand’s side – from the pinky finger to the wrist – from right to left. The phone will save a screenshot in your photos folder.
Some Android devices feature a screenshot button in the Quick Settings menu. You can access this menu by swiping downwards from the top of your phone. This is the same menu you would use to turn on your camera’s flashlight.
All Android devices support third-party apps that can take screenshots. Most apps that record screen-share videos can also create screenshot images. Screenshot Easy is an example of a top-rated screenshot app for Android that allows users to take screenshots in multiple ways, including by shaking their phone.
It’s also possible to take screenshots of your Android device’s screen from an external computer. Android Recorder is an app that lets you cast your device’s screen to a computer and take screenshots.
08. How to Screenshot on iPhone
Since Apple is the only authorized iPhone manufacturer, there are far fewer differences between various iPhone models. Nevertheless, older iPhones take screenshots differently than newer models.
The oldest iPhone models (up to iPhone 4S) included a front-facing Home button and a Top power button. To take a screenshot with this iPhone, press the Home button and a Top (power) button at the same time and release them quickly. You will see a thumbnail of your picture appear temporarily in the lower-left corner of your screen.

With the iPhone 5, Apple moved the power button to the side of the device. Taking a screenshot on these iPhone models is the same as with the earlier models – except the Top button is now a Side button.
With the iPhone X, Apple removed the home button entirely. These iPhones still feature a side button and two volume buttons. To take a screenshot on the new iPhone models, press the Side button and the Volume up button at the same time.

As soon as you take a screenshot, iOS will let you edit and crop the resulting image. Simply tap on the plus sign in the lower-right corner to open up the iPhone’s photo editing application and begin.