
Although most of the videos that our customers typically create are for marketing purposes, and are designed to be viewed by as many people as possible, there are instances in which certain videos should not be accessed by just anyone.
When the series of images that you want to share with only a select few, That’s where Cincopa’s Access Restriction and password protection are really effective.
The best ways to protect your gallery:
- Add password protection to your gallery
- Access Restriction: general
- Enable access to Cincopa Account members
- Manage a list of your media viewers manually
- Manage a list of your media viewers with CSV file
- Enable access to members with Gmail Single-sign-on
- Enable access by Company Domain-Google Single Sign-On
Add password protection to your gallery
One of the ways to protect the media of your Gallery(s) is by assigning password protection to it.
Password protection can be set on a per gallery basis so that you can have a different password for each gallery if you are so inclined.
when this option is enabled all viewers will have to enter a password in order to view the gallery content.
Log into your Cincopa Account or Sign up for a new Cincopa Account
In case you have not created a gallery yet, find out how by following this link create a Cincopa Gallery
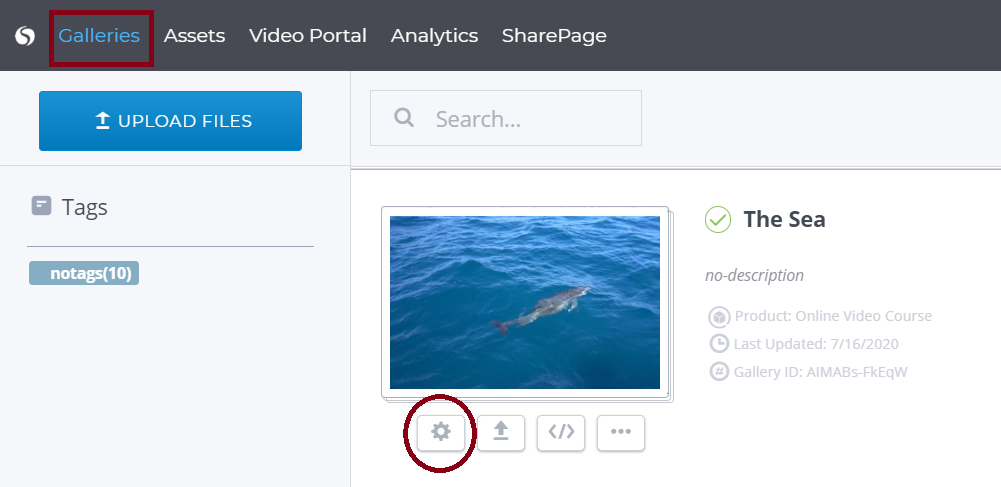
Navigate to the gallery you need to add a password to and select the settings icon
Move the slider to the right under the ‘Privacy’ heading to turn ON the password protection option
The password protection preview will be displayed on top of your gallery.
Now you need to populate the password and associated text.
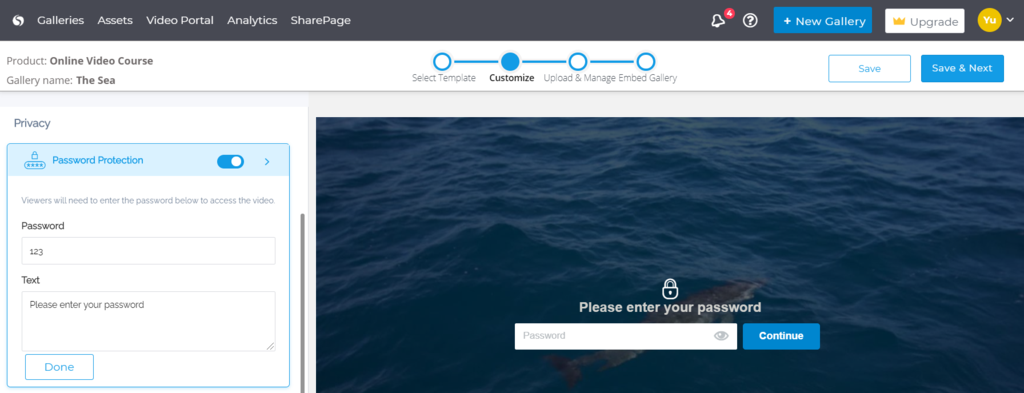
Password:
Here you should enter the password that will protect your media
Text:
Here you can assign the text that will be presented above the password entry window.
Select the DONE button to save your password changes and the Save & Next button to save all your customizations.
To test the password protection open the gallery account page and you will see a request to enter the password.
Access permissions: general
One of the ways to protect the media in your Gallery(s) is through the Access restriction list. All viewers will have to enter a password in order to view gallery content.
Log into your Cincopa Account or Sign up for a new Cincopa Account
In case you have not created a gallery yet, find out how by following this link create a Cincopa Gallery
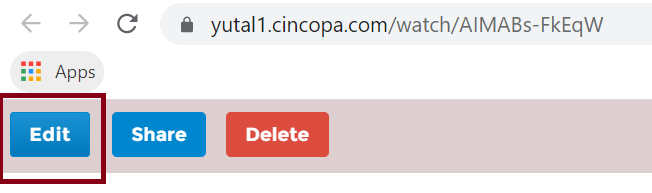
Click on the gallery to open the Account Page and enter edit mode by selecting the Edit button.
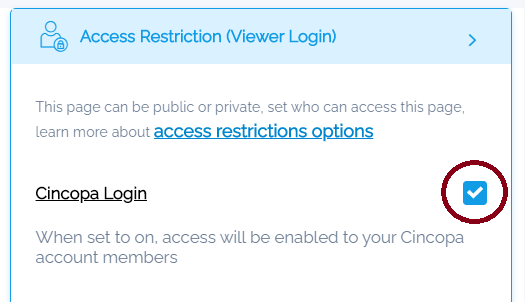
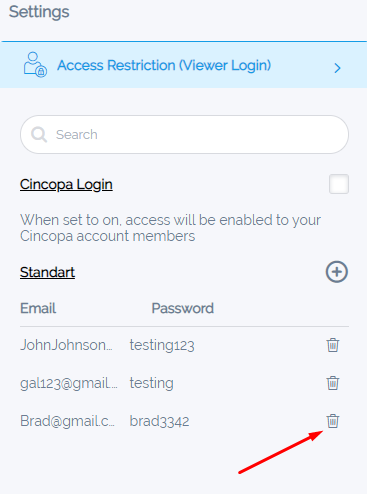
Navigate to Access Restriction (Viewer Login)
Enable Access to Cincopa account viewers
When set to ‘on’, access will be enabled to your Cincopa account viewers.
All you need to do is to check the box.
You can invite your colleagues to your Cincopa Account as Users. You can read here about how to invite your colleagues.
Manage a list of your media viewers manually
You can also manage access restriction as a list of users permitted to access your media manually or with CSV file
Add permission :
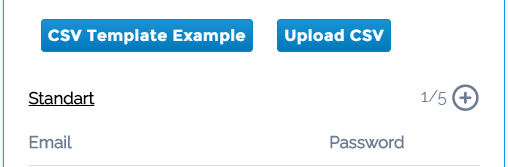
To add new user permission select the plus icon next to Standart

A new pop-up window will be open, Here’s where you can add email addresses and their associated passwords.
For example JohnJohnson@gmail.com, password: testing123
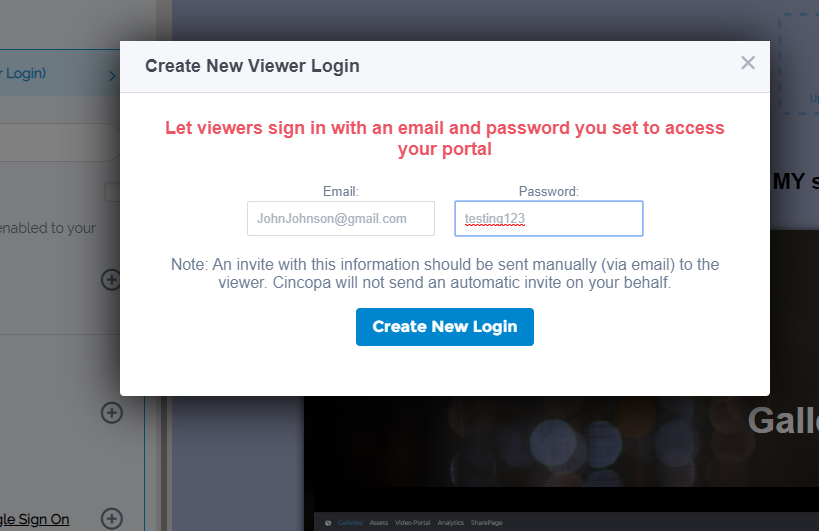
Selecting the Create New Login option will:
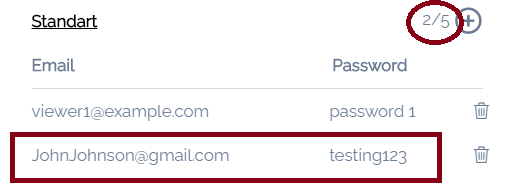
1. Save the record and create a new row under the standard section
2. Update the user permissions counter. This counter shows how many users were added to the list and the maximum number of the users that can be added to the list
Note: Each account plan enables a different max number of users that can access restricted media
Remove permission:
Remove permission simply by selecting the trashcan icon next to the user, that user will no longer have access to your media.
Manage a list of your media viewers with CSV
The best practice is to ALWAYS download the CSV file before making any changes!
First time using CSV file – Upload/Download CSV file
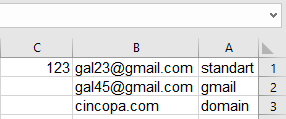
If this is your first time using a CSV file, select the CSV template example to view an example on how to populate this file or check the image below for CSV data guidelines and make sure not to write in capital letters
Note: if you have already added users manually, they will appear in the downloaded CSV file. Deleting them from the CSV file will remove this user from the access list
Now select the upload CSV option and select the updated CSV file
Note: there are no limits on CSV file name
Update existing CSV file – Upload/Download CSV file
If you have already added users via CSV or manually, you can download a CSV file containing their user names and passwords.
When adding additional users the best option would be to first download the existing users into a CSV, then add the new users to that same CSV and upload the file. If you opt to upload a new file without first downloading your existing users it will remove all of the users currently in the system.
It’s advised to manually delete any viewers before downloading the CSV file, this can be done by selecting the trashcan icon next to the corresponding row.
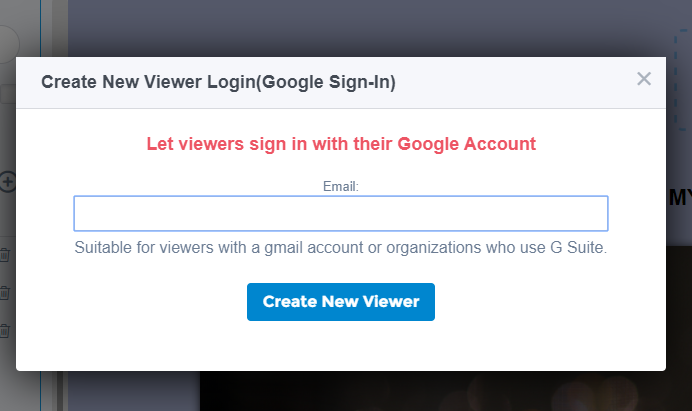
Gmail Single-sign-on:
Here you can allow any Gmail address (You can not use other providers such as Yahoo, Protonmail, etc.). Also, you can add a company address as long as that company is using G-Suite.
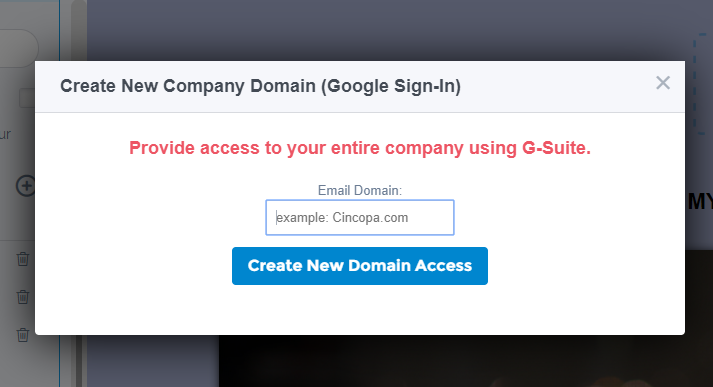
Company Domain-Google Single Sign-On:
This option allows you to provide access to all your company employees.
Everyone with the company domain email address can enter the gallery. This option is especially beneficial once you create a gallery that is relevant to all employees.
To test your access restrictions, open the gallery’s account page in an incognito browser and you will be requested to enter the username and password.