Moodle is a learning management system (LMS) created for educational needs. This platform is widely used for distance education, blended education, e-learning projects, and creating educational websites of different complexity.
Cincopa is fully compatible with this leading LMS platform. Integrating your educational website with Cincopa media plugin for Moodle video can be a great option to improve content quality and increase knowledge retention. Check out Cincopa Moodle Plugins on moodle.org site.
For information on how you can use the Cincopa plugins in the Moodle LMS as a student or teacher, please refer to this article.
How to install Moodle?
Moodle is an LMS (Learning Management System) where users can create or access the educational course. Just like WordPress even Moodle has a blog version (moodle.com) and a self-hosted version (moodle.org).
We are going to work with Moodle.org where you can install our plugins.
Access this URL: https://download.moodle.org/ and download the latest available version.
Why Cincopa Moodle Plugins?
In Moodle, users create educational tutorials and hence they regularly have to embed media to make the tutorials easier to understand using screenshots and videos. This is where Cincopa plugins come for the rescue.
Cincopa plugins in Moodle helps the users to embed their Cincopa images, videos, and audios to their Moodle website or courses.
Cincopa Plugins
There are four plugins made by Cincopa for Moodle users. See below for more details about each of them:
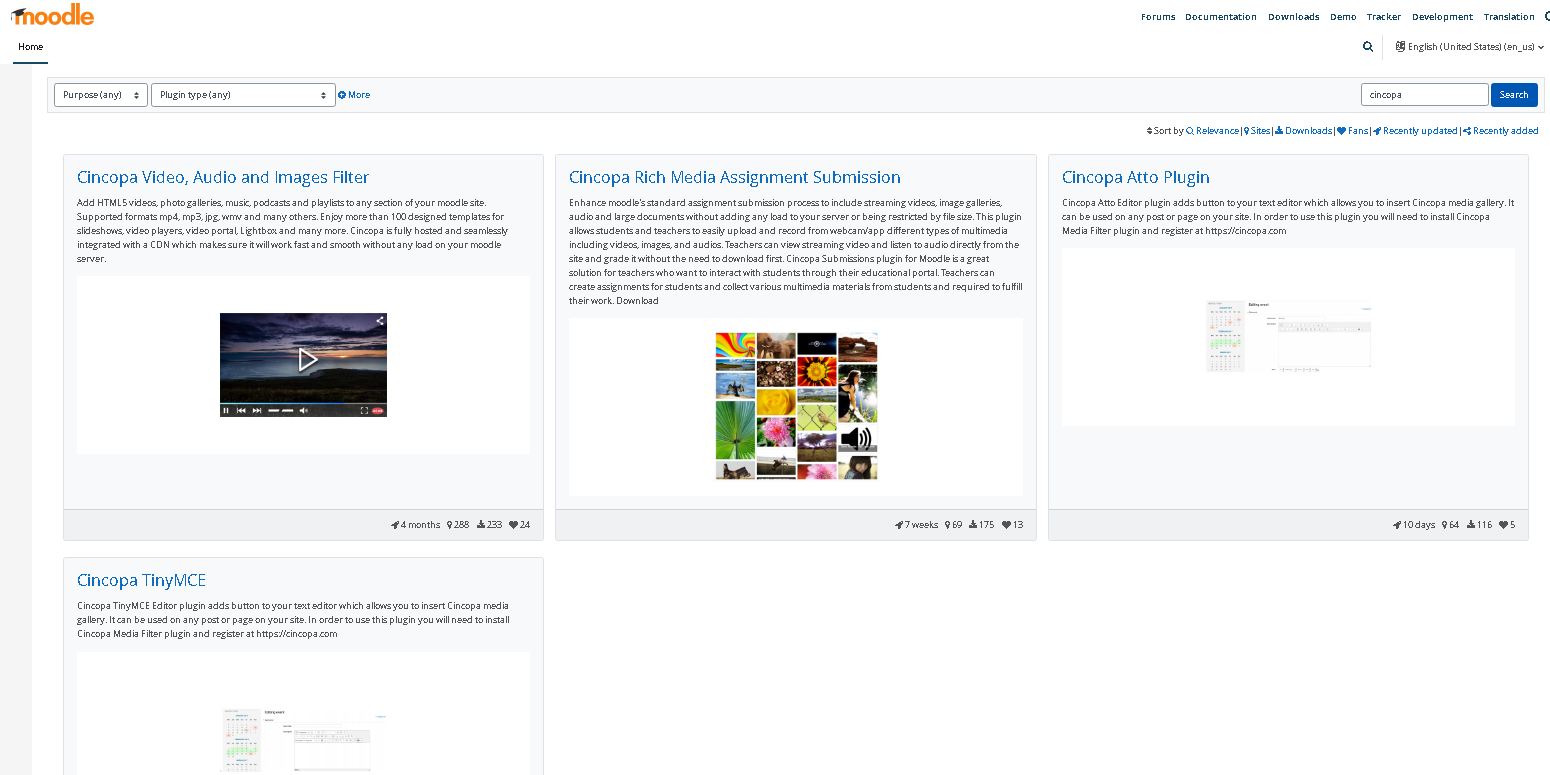
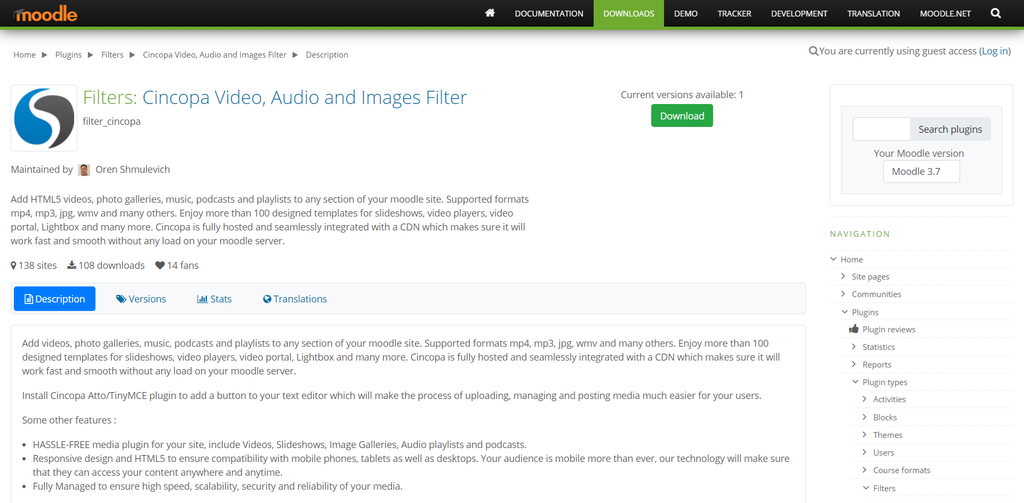
1. Cincopa Video, Audio and Images Filter
Cincopa Video, Audio and Images Filter allows you to add HTML5 videos, photo galleries, music, podcasts and playlists to any section of your moodle site. It supports formats like mp4, mp3, jpg, wmv and many others which you can easily add to your moodle site. Enjoy more than 100 designed templates for slideshows, video players, video portal, Lightbox and many more. Cincopa is fully hosted and seamlessly integrated with a CDN which makes sure it will work fast and smooth without any load on your moodle server.
How to install Cincopa Video, Audio and Images Filter?
- Access the URL: https://moodle.org/plugins/filter_cincopa and click on Download to download the plugin to your computer.

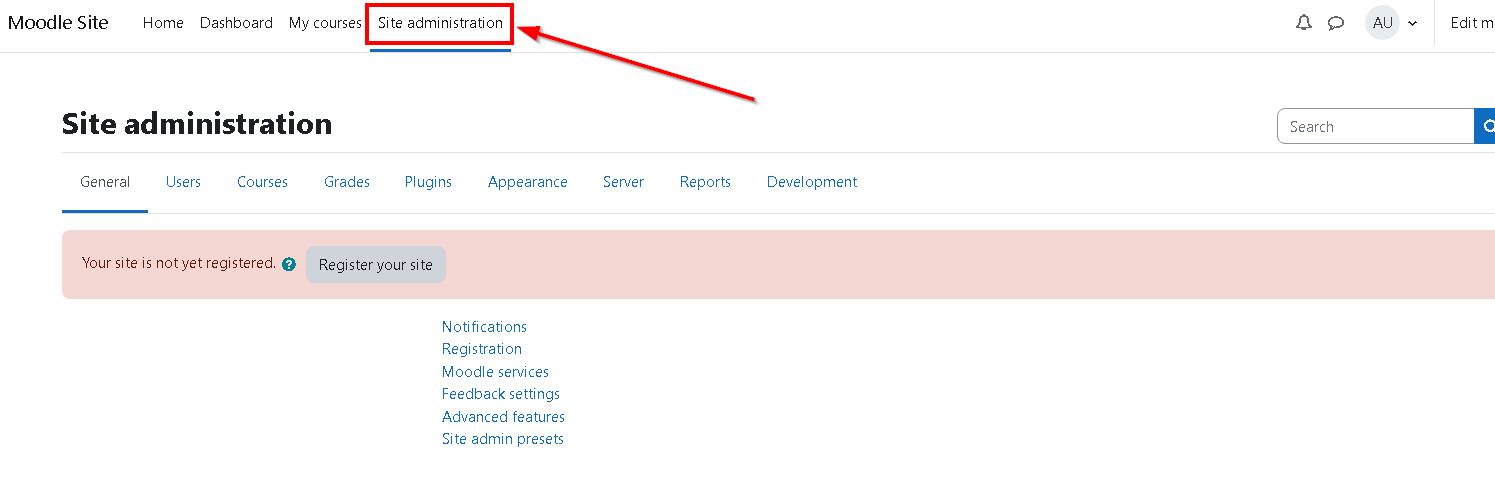
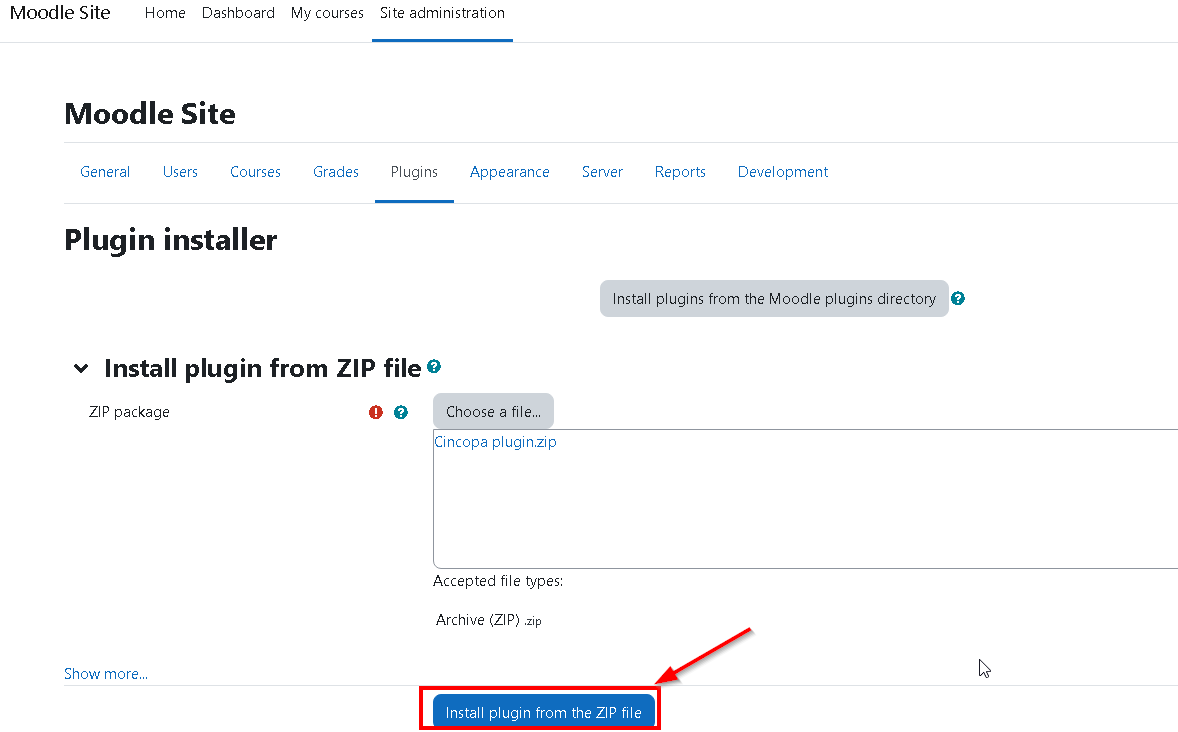
- Once the plugin is downloaded you can access your Moodle Dashboard and click on Site Administration.
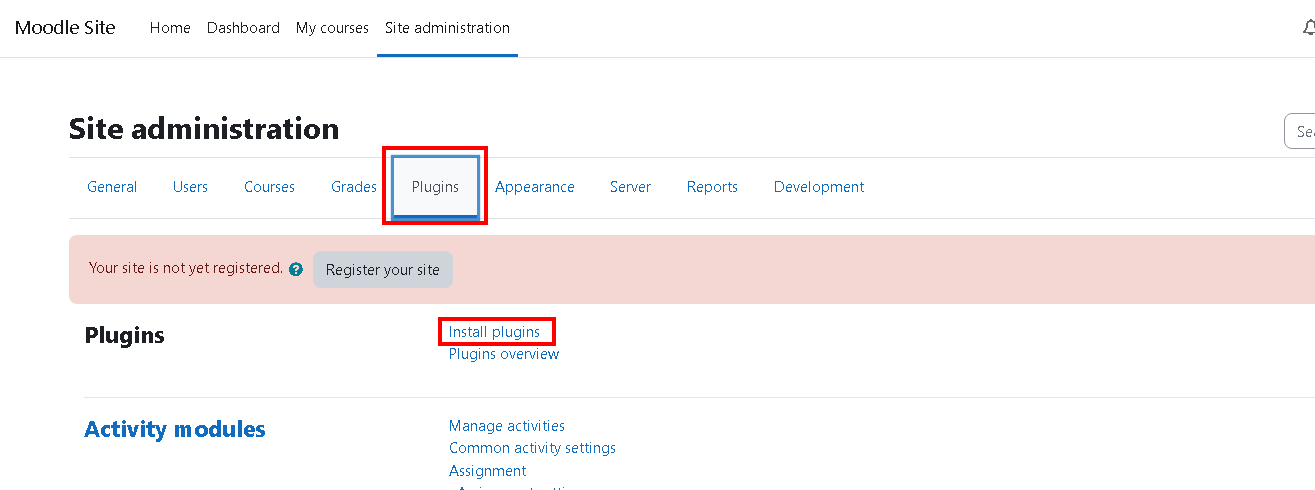
- Now click on Plugins >> Install Plugins
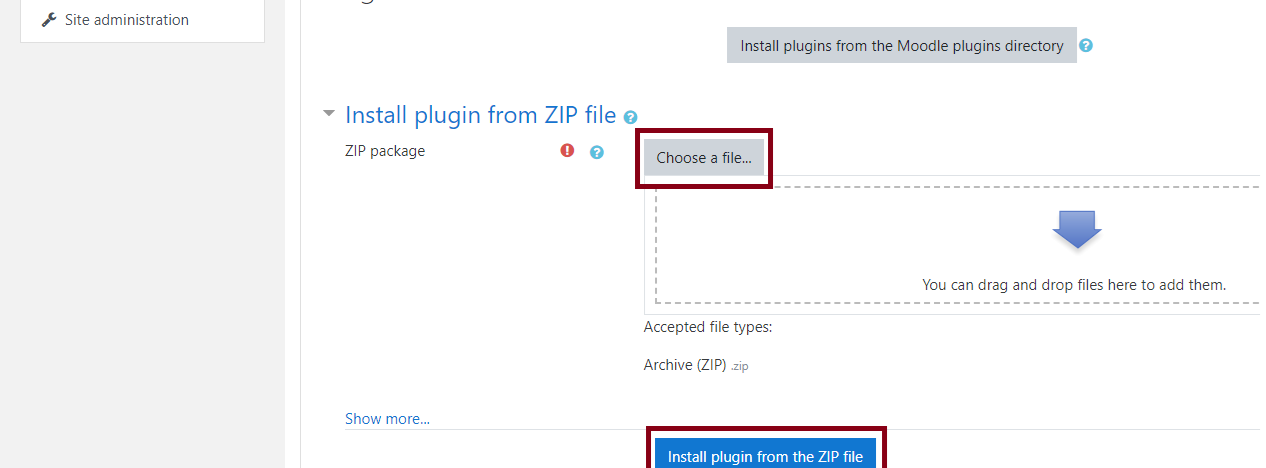
- Click on Choose a file to browse the downloaded plugin or drag and drop files from your computer.
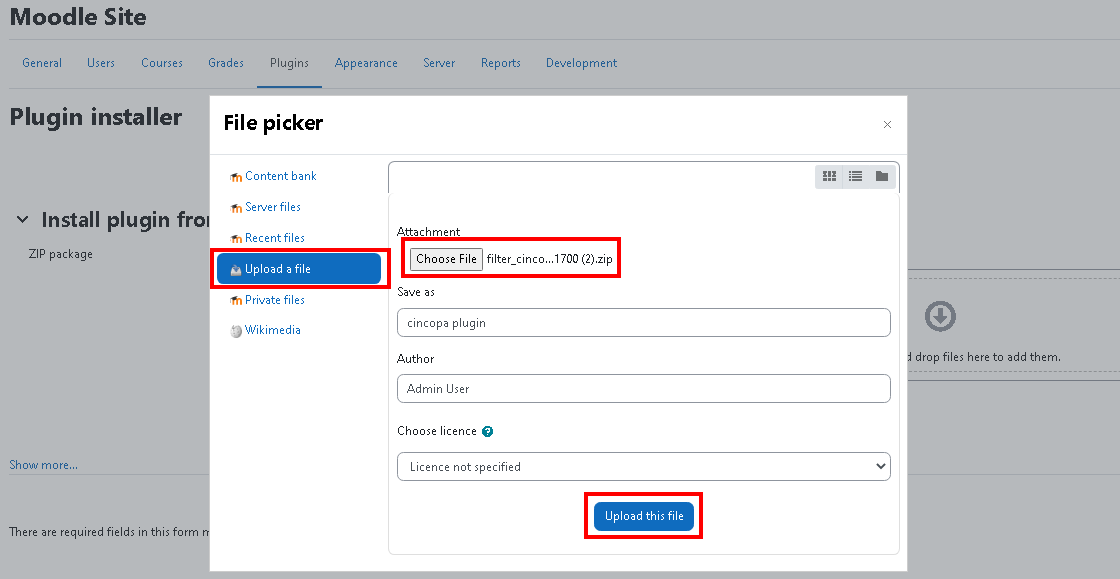
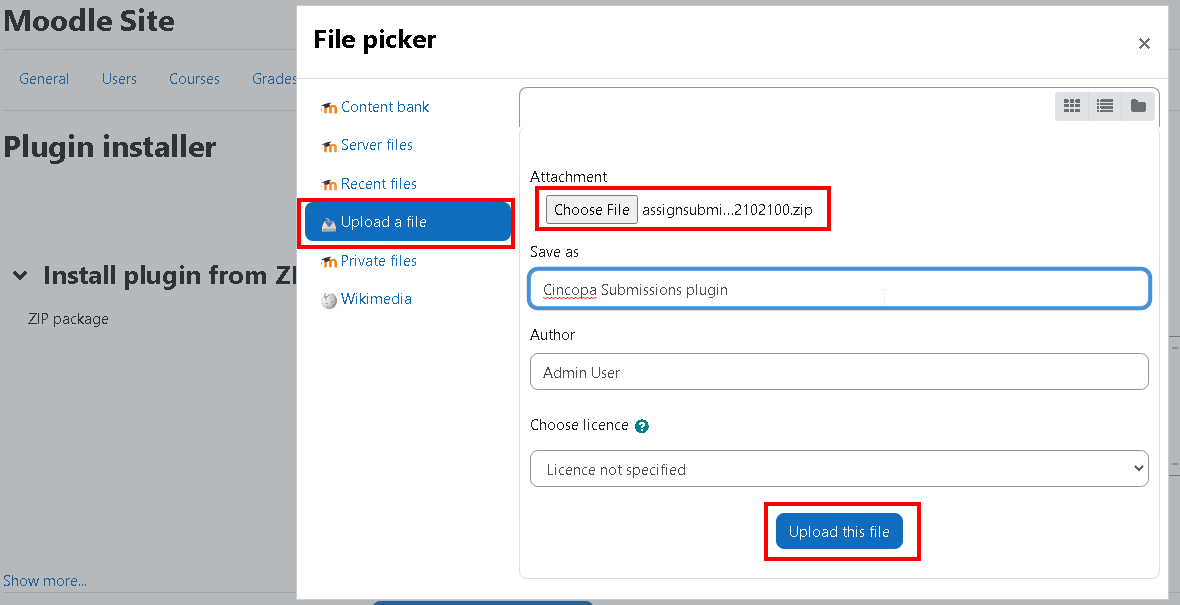
- Click on Upload a file > Choose file > select the downloaded plugin zip file and click on Upload this file button.
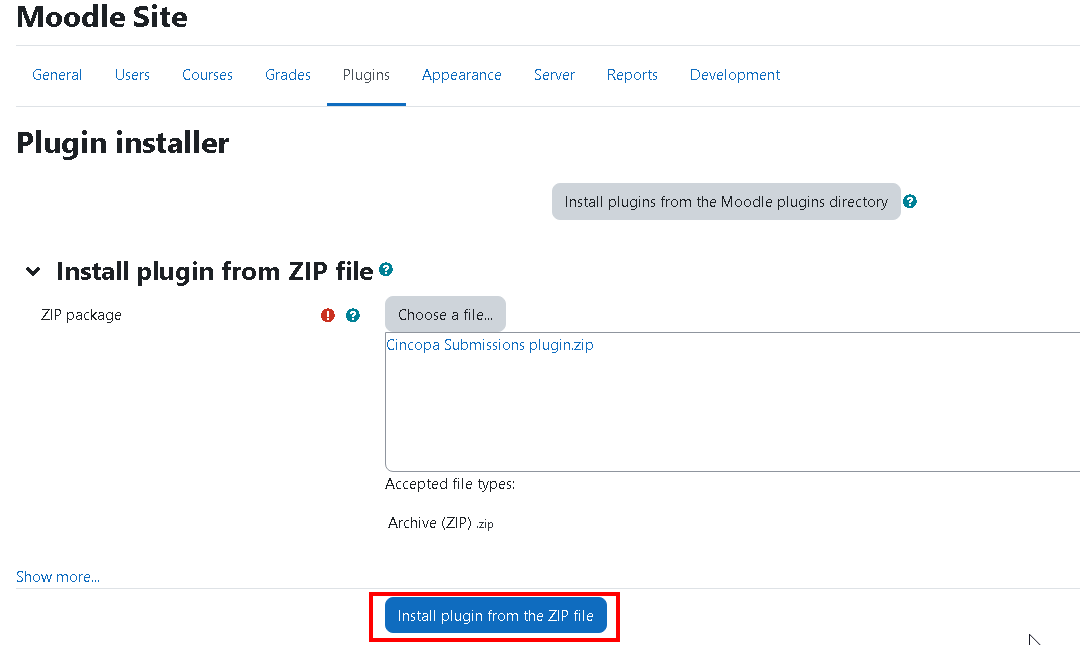
- Click on Install plugin from the zip file button.
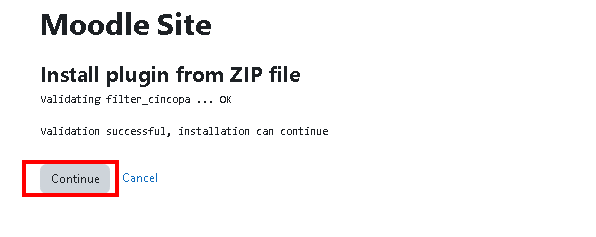
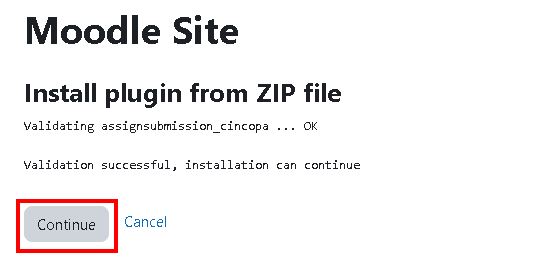
- Click on the Continue button.
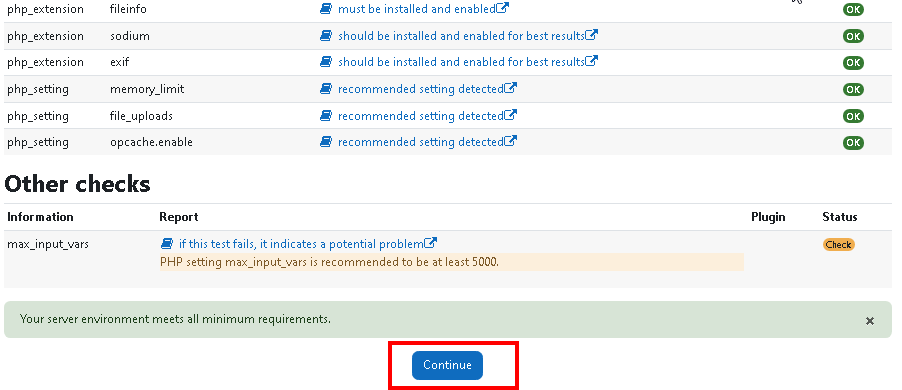
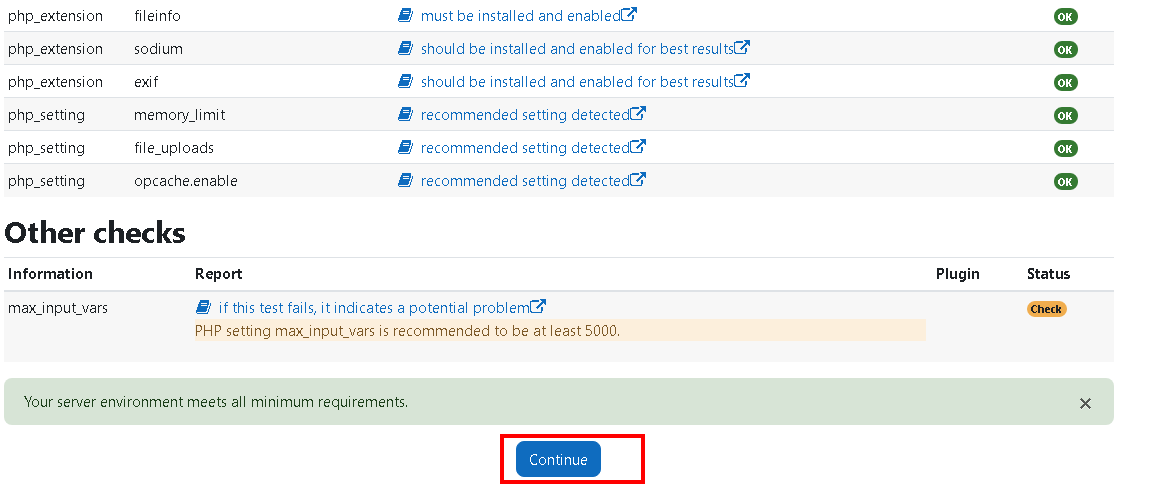
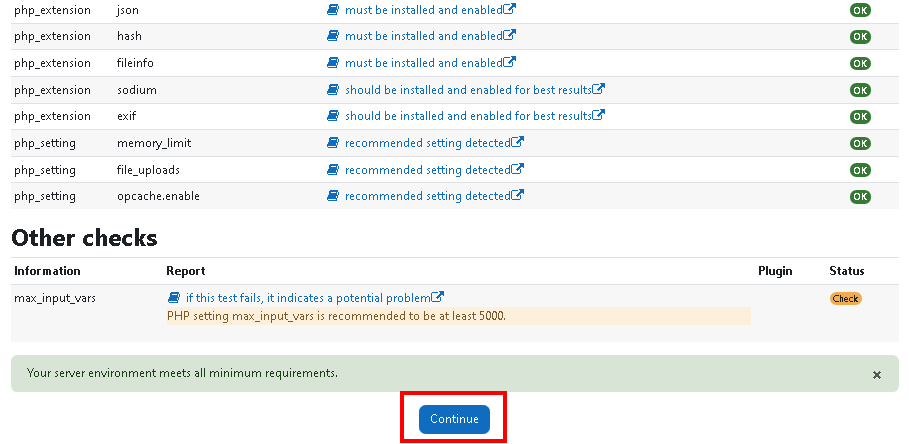
- Once the server checks are done, click Continue.
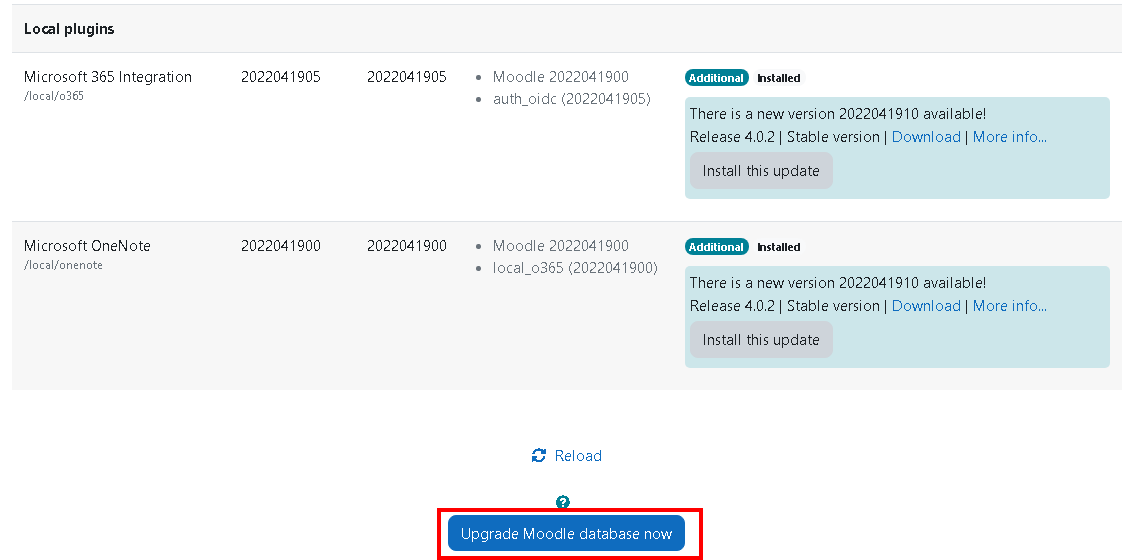
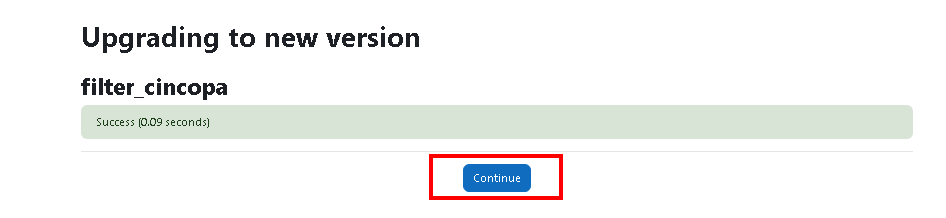
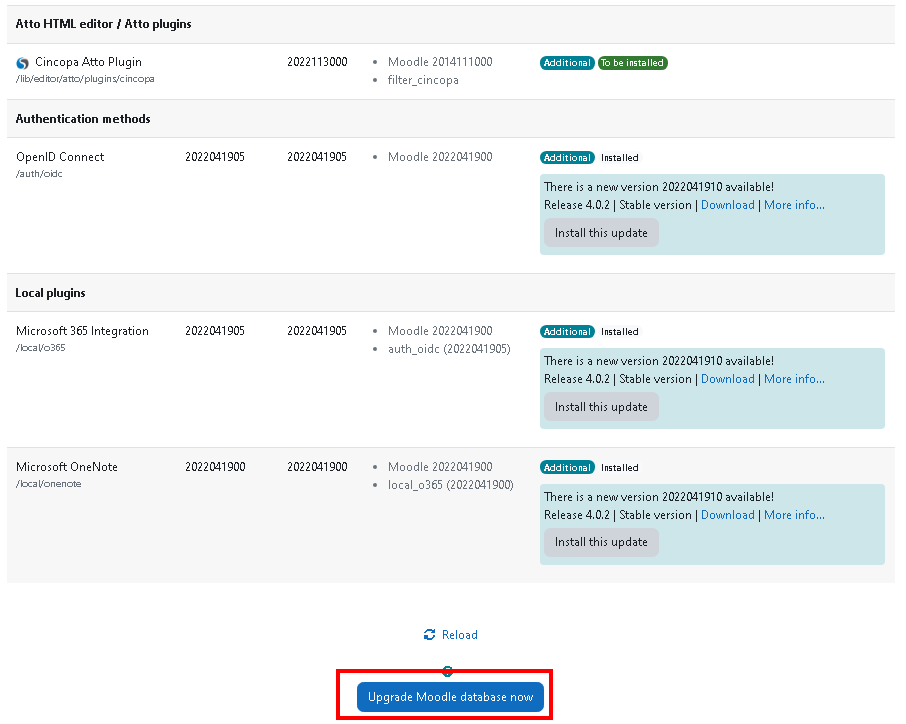
- Next click on Upgrade Moodle Database Now to check if the plugin is updated.
- Click Continue.
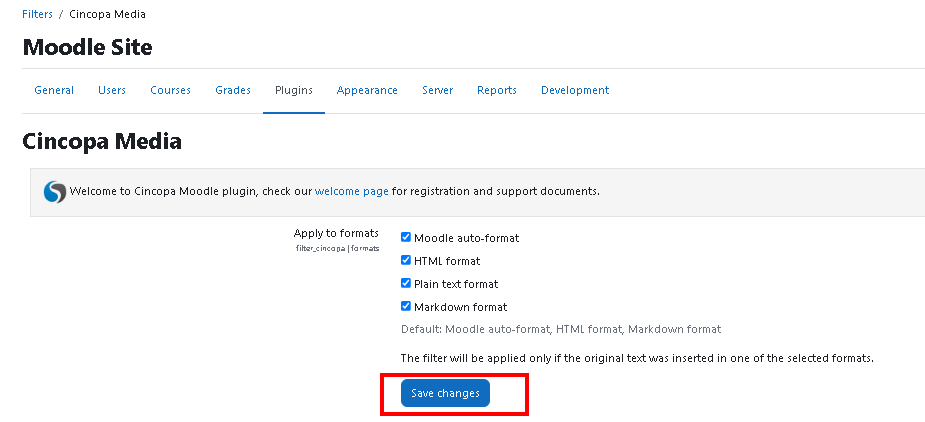
- Choose the formats where you would want the Cincopa Media to appear and then click on Save
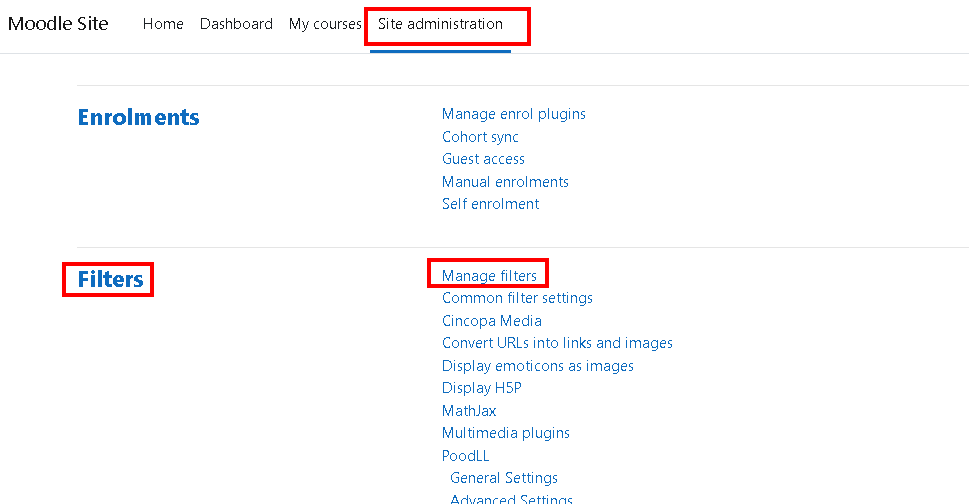
- Now you can go back to Site Administration >> Plugins >> Scroll Down to Filters >> Click on Manage Filters.
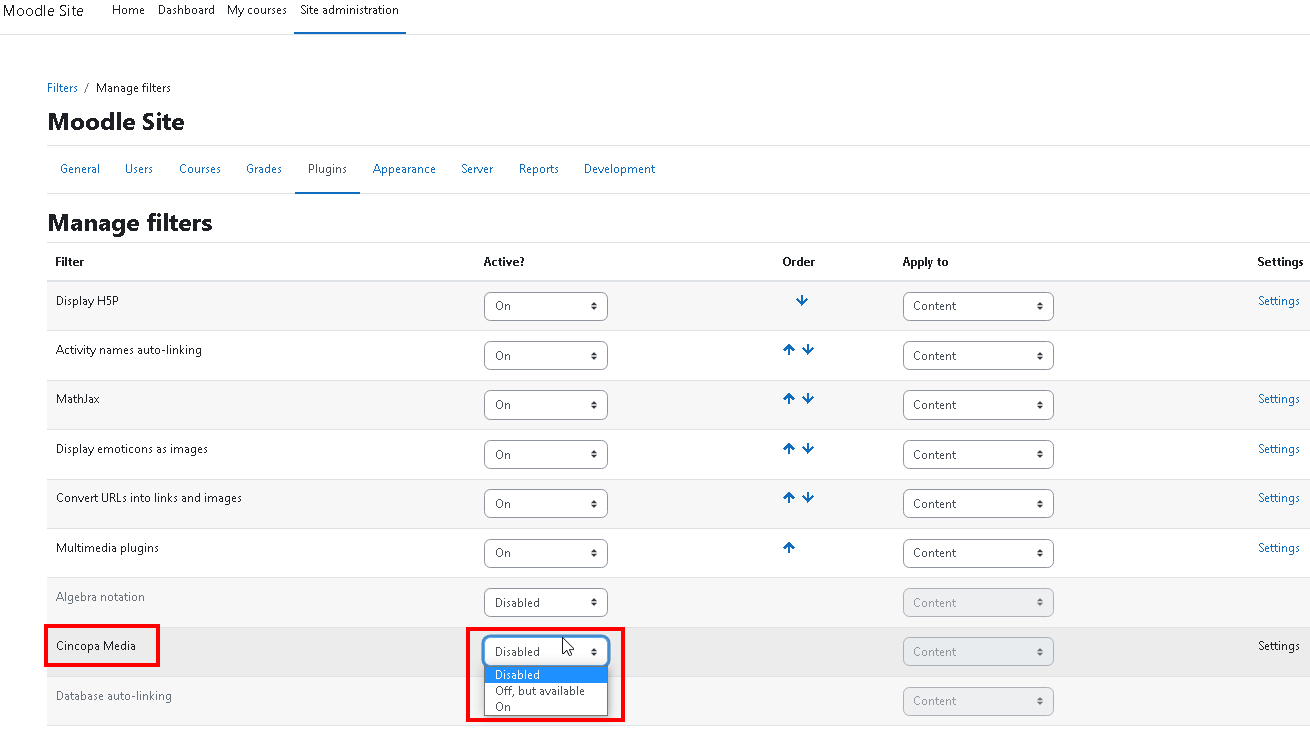
- Under Manage Filters, simply enable the Cincopa Media Plugin by selecting On.

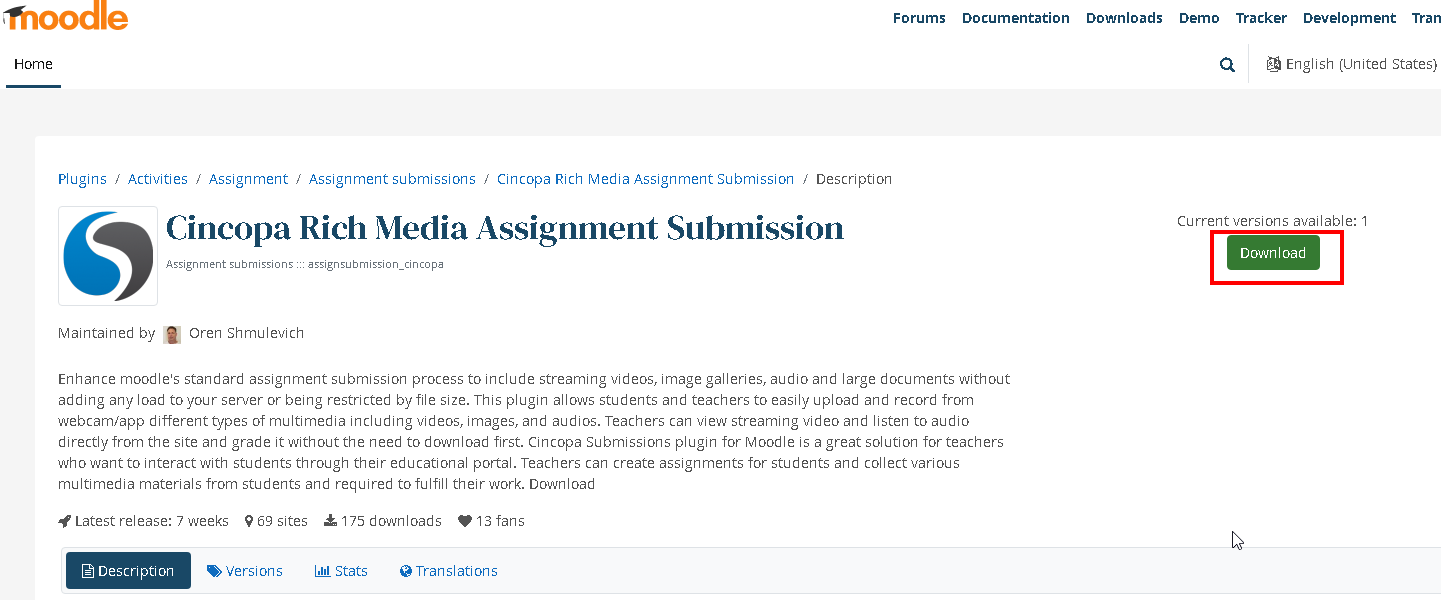
2. Cincopa Rich Media Assignment Submission:
Enhance moodle’s standard assignment submission process to include streaming videos, image galleries, audio and large documents without adding any load to your server or being restricted by file size. This plugin allows students and teachers to easily upload and record from webcam/app different types of multimedia including videos, images, and audios. Teachers can view streaming video and listen to audio directly from the site and grade it without the need to download first. Cincopa Submissions plugin for Moodle is a great solution for teachers who want to interact with students through their educational portal. Teachers can create assignments for students and collect various multimedia materials from students and required to fulfill their work.
How to install Cincopa Rich Media Assignment Submission?
- Access the URL: https://moodle.org/plugins/assignsubmission_cincopa and click on Download to download the plugin to your computer.
- Once the plugin is downloaded you can access your Moodle Dashboard and click on Site Administration.
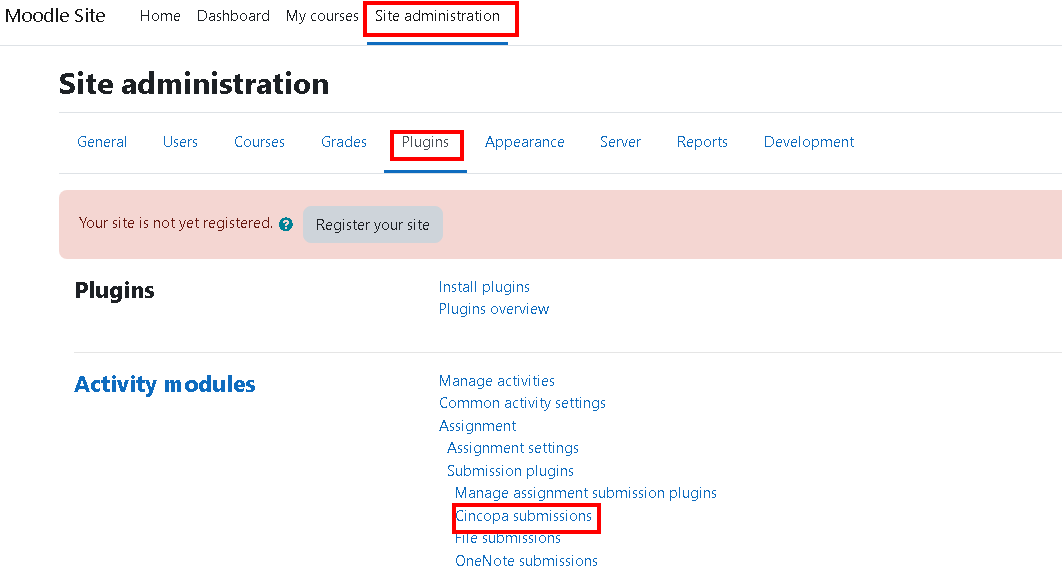
- Now click on Plugins >> Install Plugins.
- Click on Choose a file to browse the downloaded plugin or drag and drop files from your computer.
- Click on Upload a file > Choose file > select the downloaded plugin zip file and click on Upload this file button.
- Click on Install plugin from the zip file button.
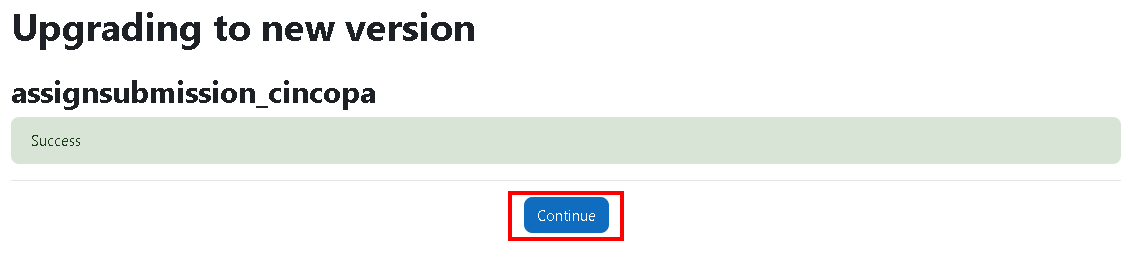
- Click on the Continue button.
- Once the server checks are done, click Continue.
- Next click on Upgrade Moodle Database Now to check if the plugin is updated.
- Click Continue.
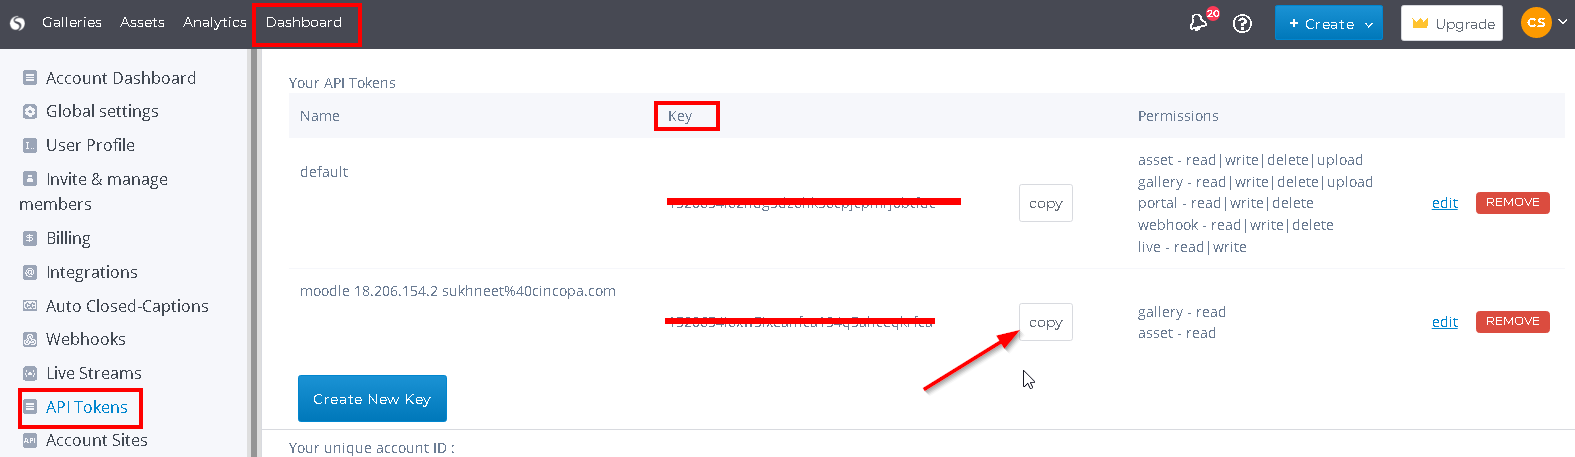
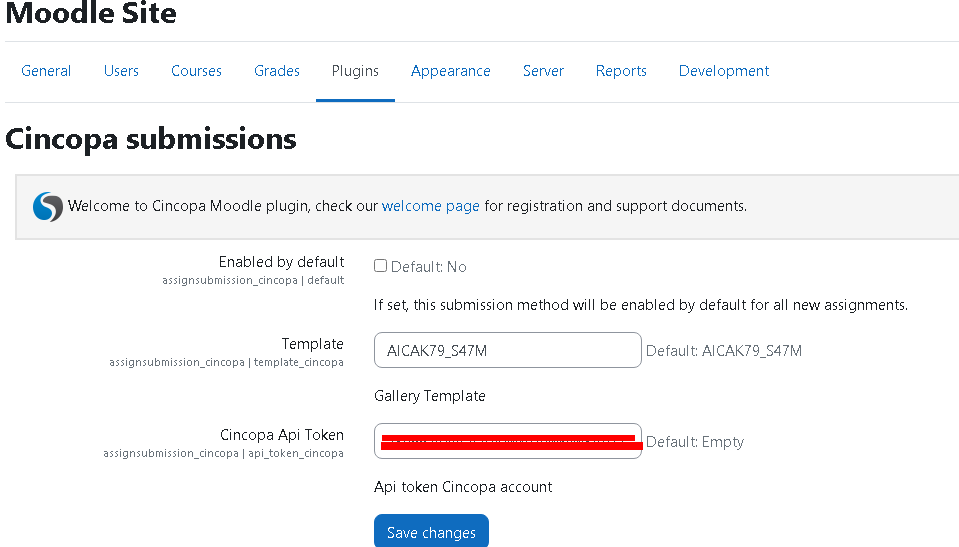
- Copy API token from your Cincopa account under Dashboard >> API tokens and paste it in the Cincopa API Token field and save changes.
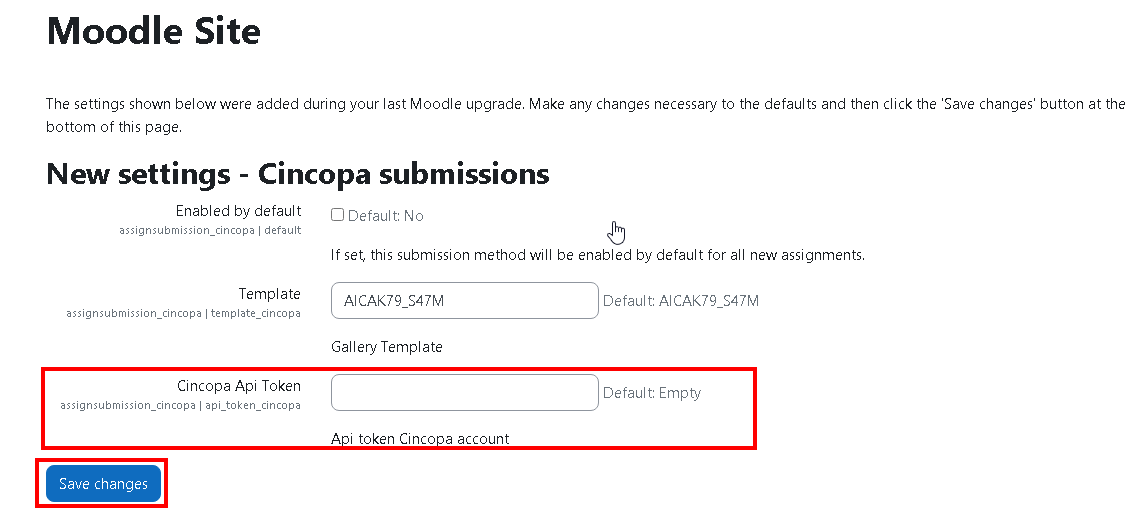
Note: If you don’t enter the API token at the time of installing the submission plugin, you can always go back to Site Administration >> Plugins >> Scroll Down and click on Cincopa Submissions.
Copy and Paste the API token and gallery shortcode in the Cincopa submissions dashboard. Save the changes.

3. Cincopa Atto Plugin:
Cincopa Atto Editor plugin adds button to your text editor which allows you to insert Cincopa media gallery. It can be used on any post or page on your site. In order to use this plugin you will need to install Cincopa Media Filter plugin.
How to install Cincopa Atto Plugin?
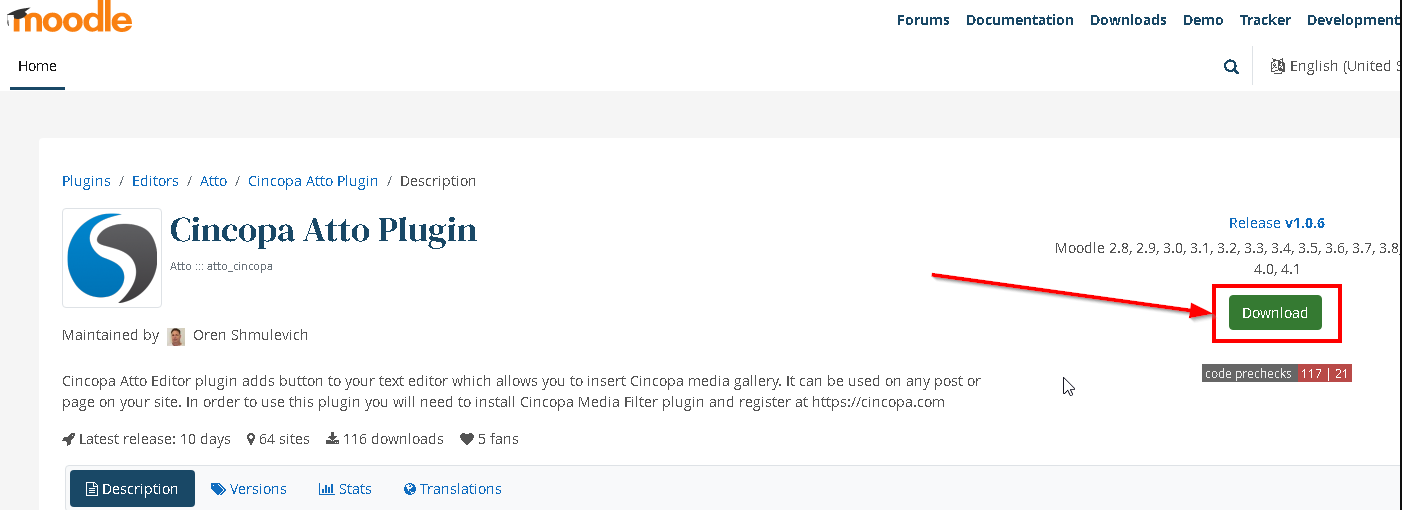
- Access the URL: https://moodle.org/plugins/atto_cincopa and click on Download to download the plugin to your computer.
- Once the plugin is downloaded you can access your Moodle Dashboard and click on Site Administration.
- Now click on Plugins >> Install Plugins.
- Click on Choose a file to browse the downloaded plugin and then click on Install plugin from my zip file.
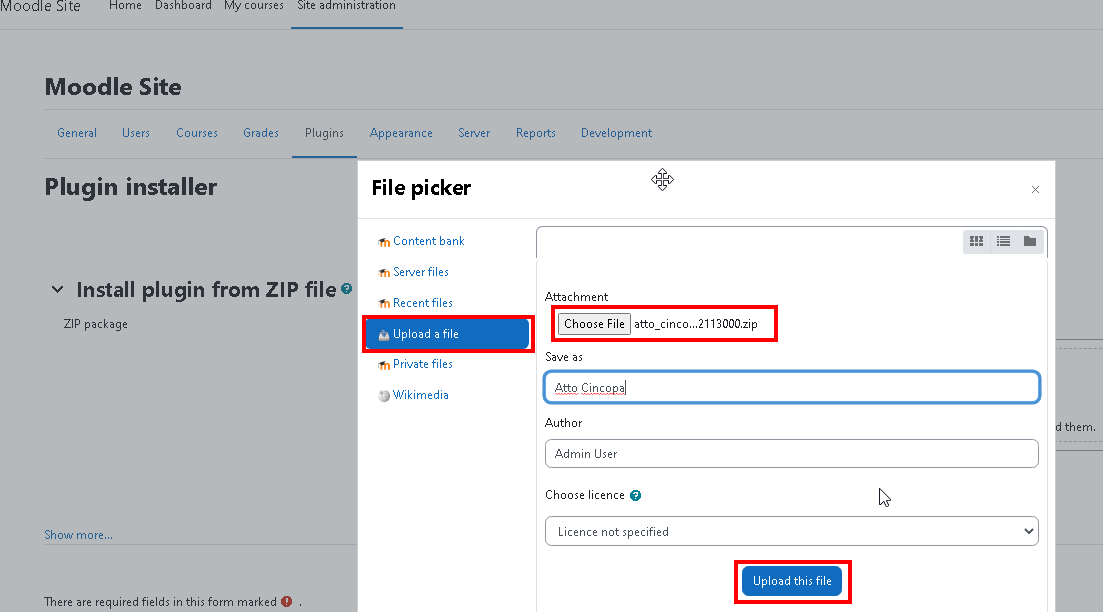
- Click on Upload a file > Choose file > select the downloaded plugin zip file and click on Upload this file button.
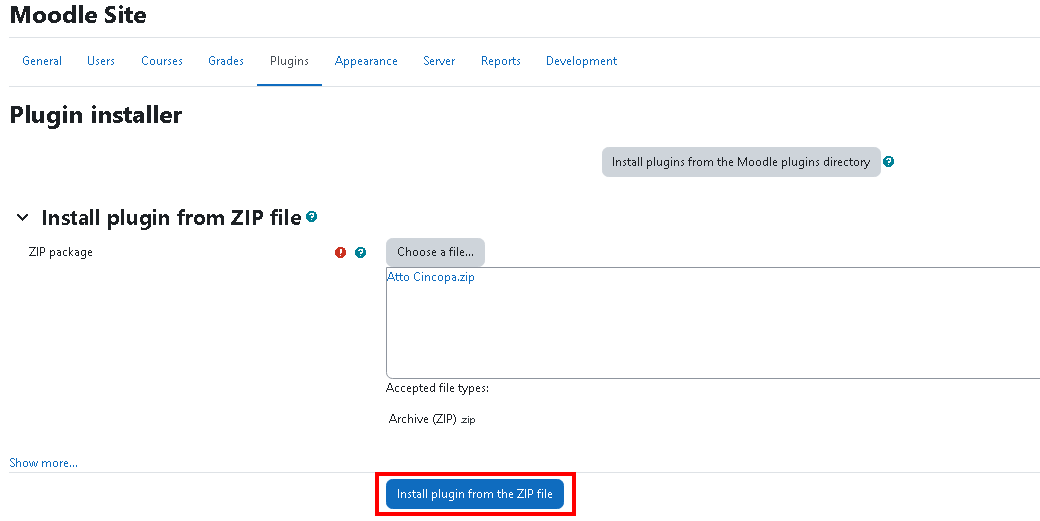
- Click on Install plugin from the zip file button.
- Click on the Continue button.
- Once the server checks are done, click Continue.
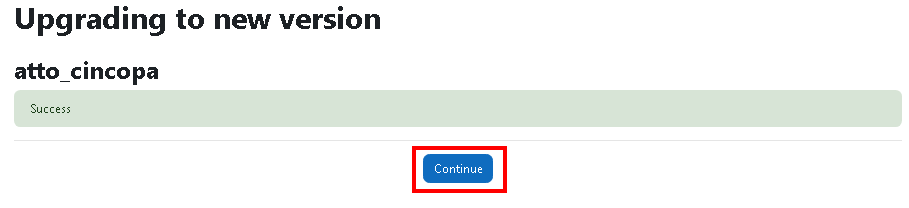
- Next click on Upgrade Moodle Database Now to check if the plugin is updated.
- Click Continue.
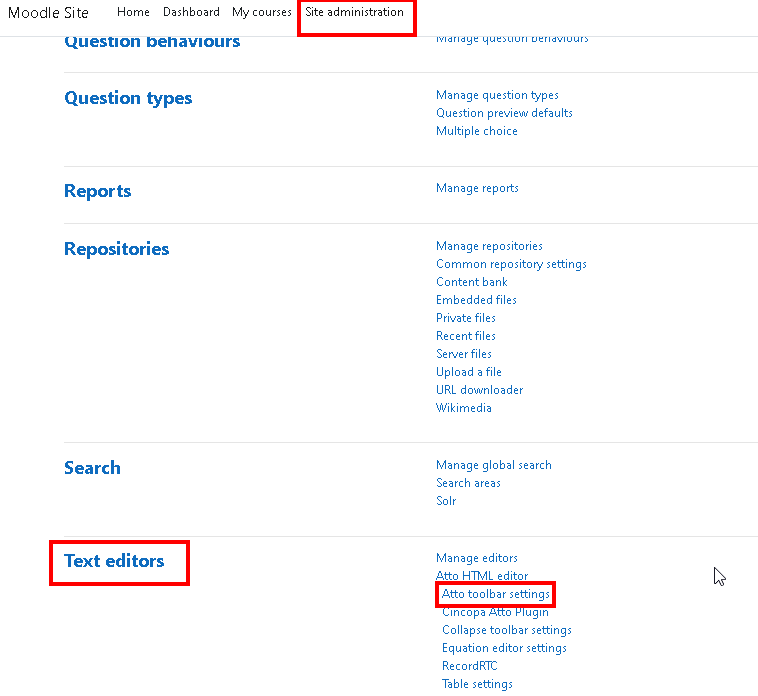
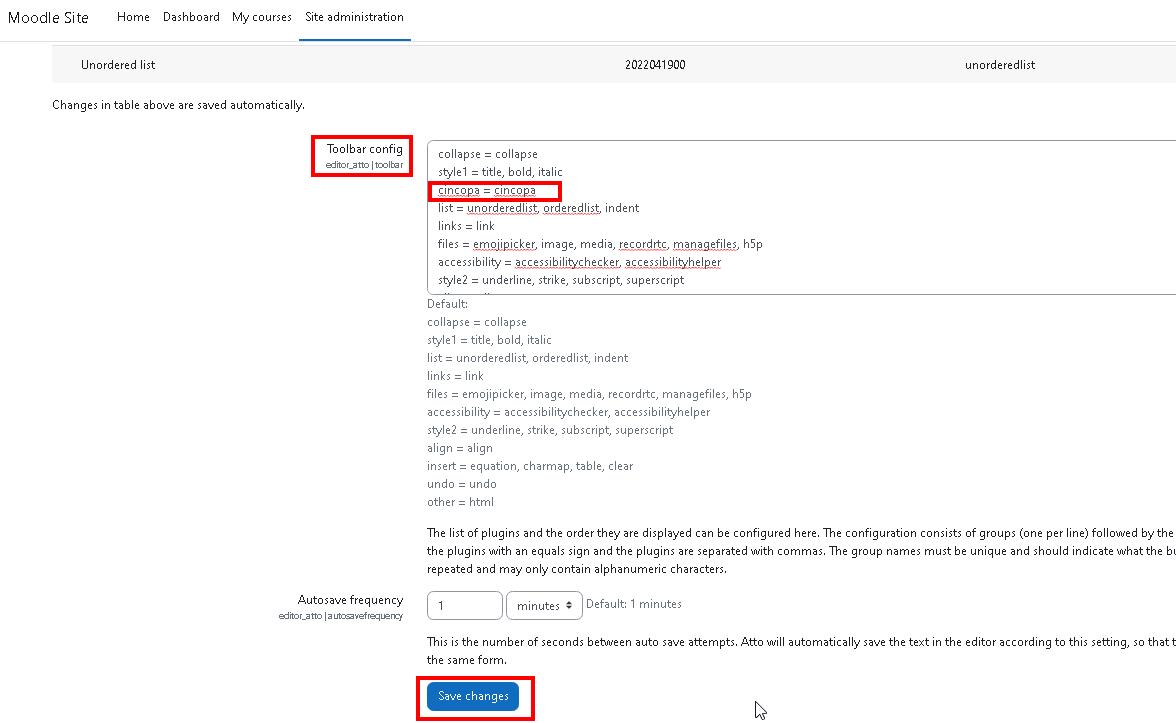
- Now go back to Site Administration >> Plugins >> Scroll Down to Text Editors >> click on Atto Toolbar settings.
- Scroll Down to Toolbar Config >> Add ‘cincopa = cincopa‘ after >> style1 = title, bold, italic. Click on Save Changes button at the bottom.
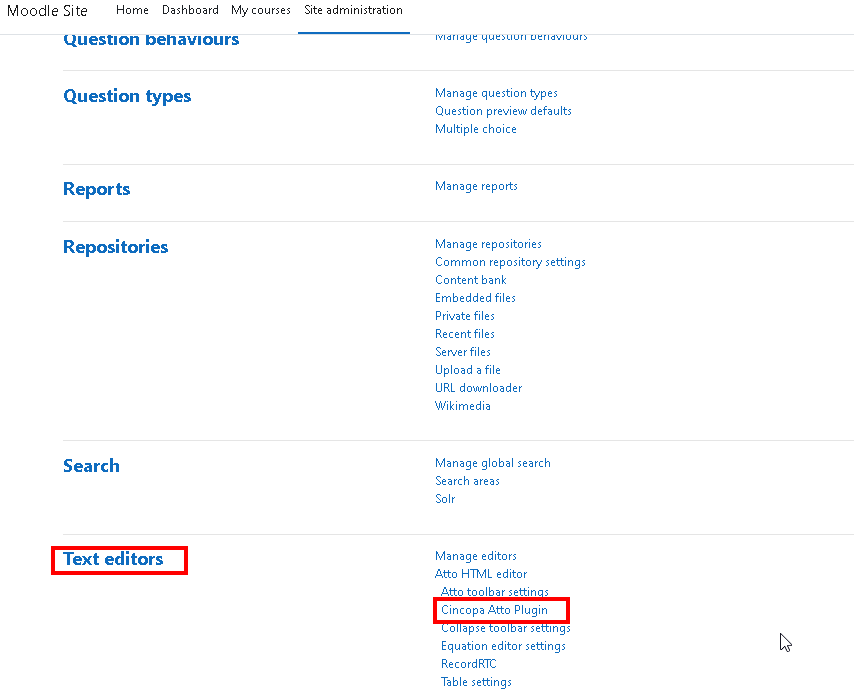
- Now go to Site Administration >> Plugins >> Scroll Down to Text Editors >> click on Cincopa Atto Plugin.
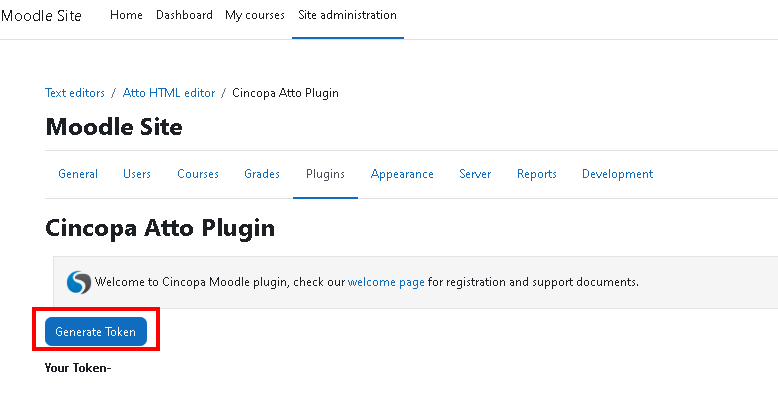
- Click on Generate token to connect your Cincopa account to your moodle site.
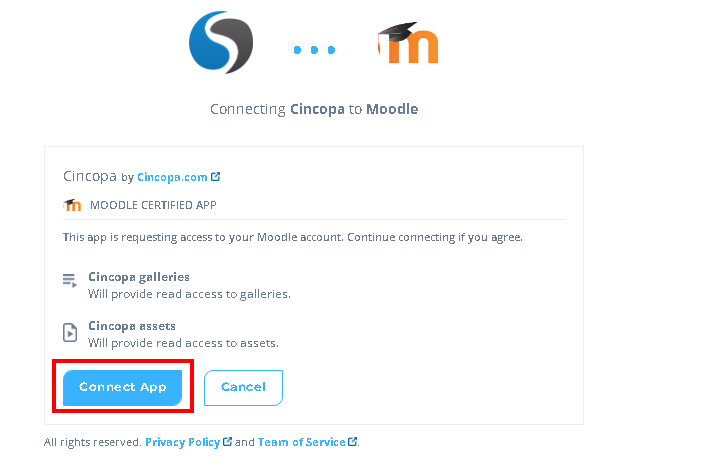
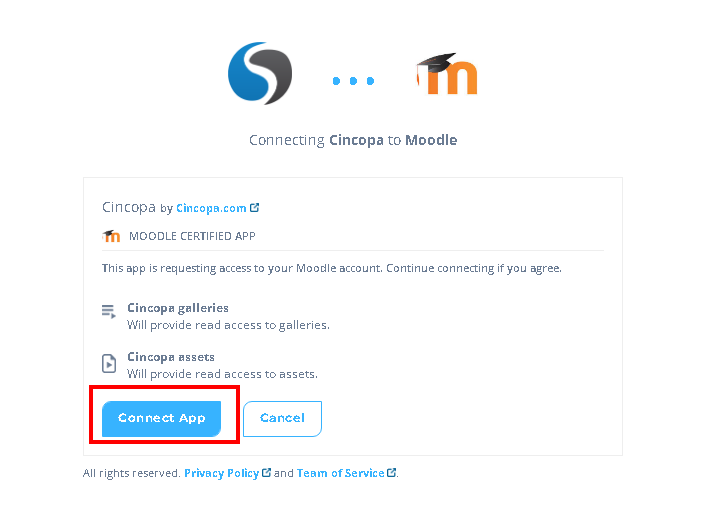
- Click on Connect App button. A token will get generated and your cincopa account will get linked to moodle.

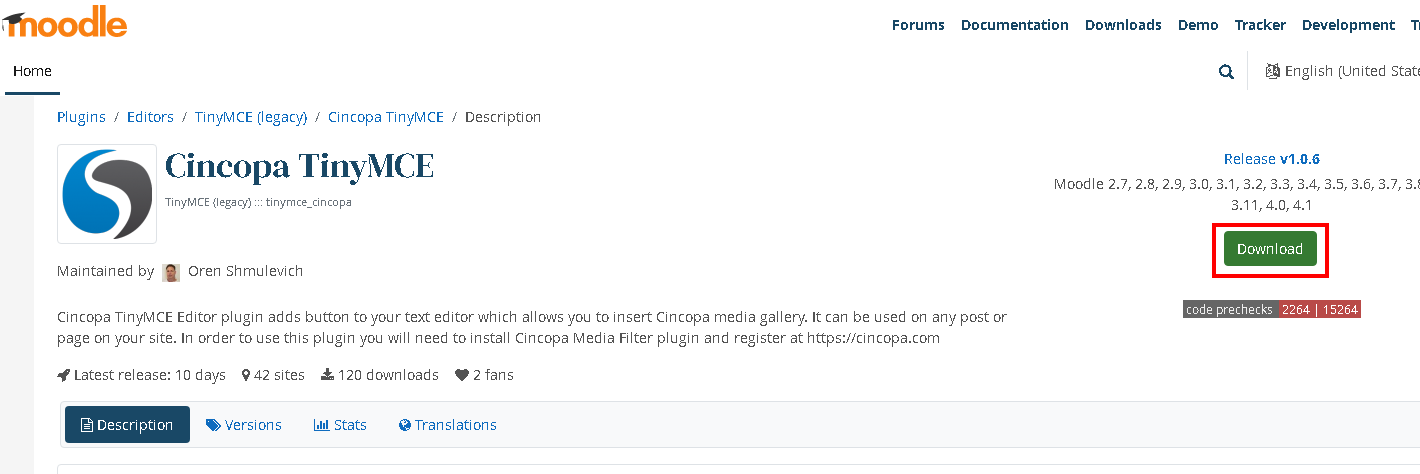
4. Cincopa TinyMCE:
Cincopa TinyMCE Editor plugin adds button to your text editor which allows you to insert Cincopa media gallery. It can be used on any post or page on your site. In order to use this plugin you will need to install Cincopa Media Filter plugin.
How to install Cincopa TinyMCE?
- Access the URL: https://moodle.org/plugins/tinymce_cincopa and click on Download to download the plugin to your computer.
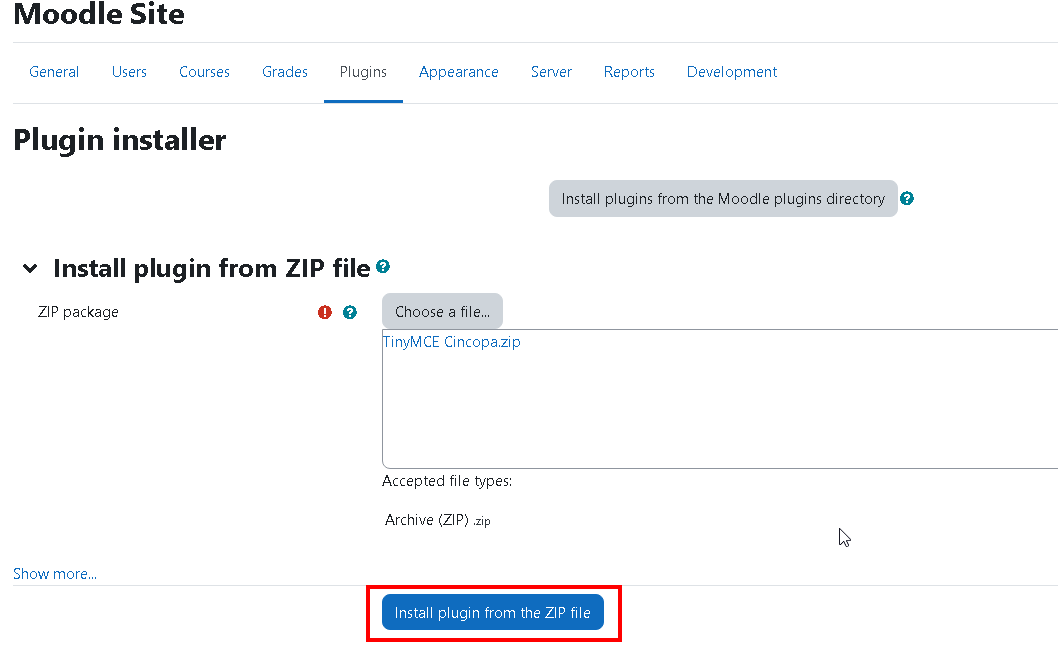
- Once the plugin is downloaded you can access your Moodle Dashboard and click on Site Administration.
- Now click on Plugins >> Install Plugins.
- Click on Choose a file to browse the downloaded plugin or drag and drop files from your computer.
- Click on Upload a file > Choose file > select the downloaded plugin zip file and click on Upload this file button.
- Click on Install plugin from the zip file button.
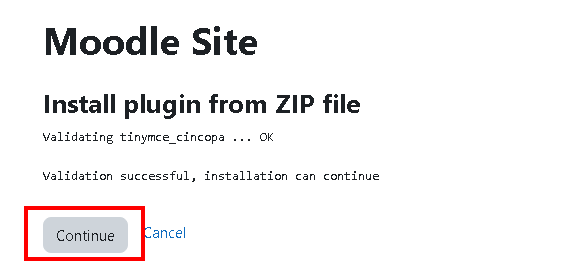
- Click on the Continue button.
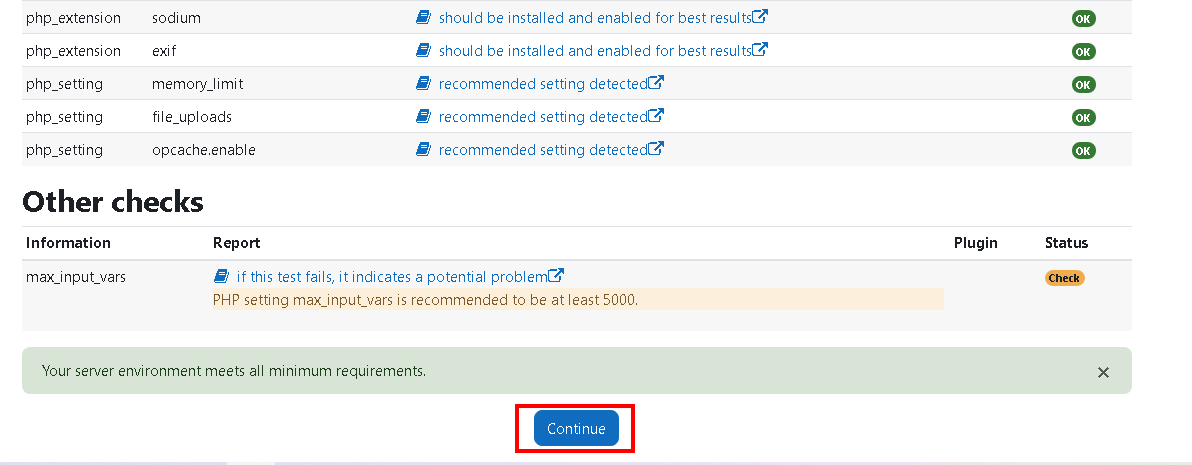
- Once the server checks are done, click Continue.
- Next click on Upgrade Moodle Database Now to check if the plugin is updated.
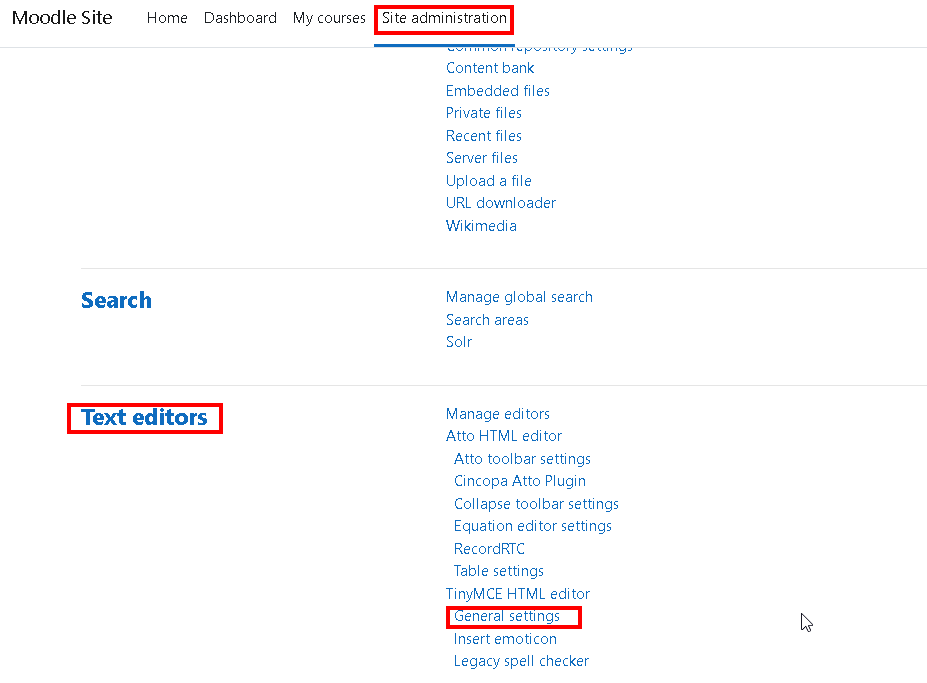
- Now go back to Site Administration >> Plugins >> Scroll Down to Text editors >> TinyMCE HTML editor >> General Settings.
- Click on Settings for TinyMCE editor.
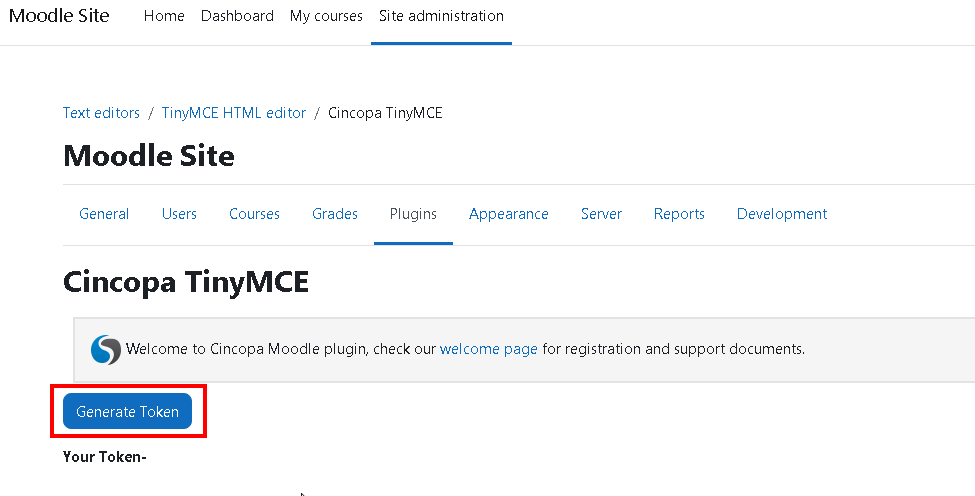
- Click on Generate token button to connect your Cincopa account to your moodle site.
- Click on Connect App button. A token will get generated and your cincopa account will get linked to moodle.
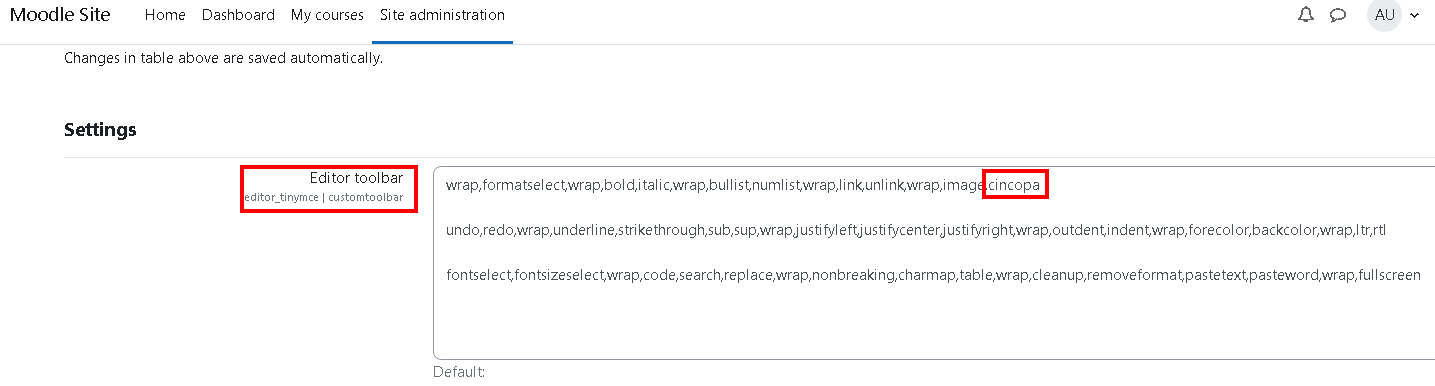
- Now back to General Settings, type ‘cincopa’ in the Editor Toolbar as shown below and save changes.