Each gallery has a “Premium Settings” section. Using these settings you can control how your gallery looks like and acts. Based on the gallery skin you can change the size, arrows and text display, transition and rotating speed, etc
To get to the settings you need to go to “My Galleries” page.
Edit Gallery

You will see all the customizible settings of the specific skin. There are 3 types of settings: Basic, Advanced and Misc
Basic settings
You can change your gallery name and basic size settings.

Advanced settings
Now you can update some advanced skin settings (some of the features are available to premium users only). Then you can preview your gallery again to see how it
looks after the adjustment of the settings or continue to files upload.
As a premium user you can customize your gallery settings, remove Cincopa brand to make the gallery look more natural on your website, allow your visitors to
download files from your gallery, change the size of the displayed thumbnails and adjust many other settings based on your skin design.

Each skin has its own settings, based on the features of the specific skin.
Note: you can edit yourself the CSS and create different gallery designs. Click “Edit” button to open the CSS editor.

Edit the CSS and click “Save” to save your design.

You can make title/caption and description for your uploaded files to be visible on galleries.

You can set the autoplay / auto start to “On” which triggers the gallery to start playing as soon as it is loaded (depending on skin gallery selected it can be found on different tabs).
 or
or  or
or 
You can pre-set volume on music and video skins for your galleries.
For video skins “Volume Level” setting will be displayed. Please fill in here a value from 0 to 100 depending on your needs.

For audio skins “Volume” setting will be displayed. Please fill in here a value from 0 to 100 depending on your needs.

Preview gallery. Volume bar will be displayed according to the value provided to Volume setting from “Advanced” > step 2.

You can add external links to images in your galleries.
Depending on the skin selected there are two different settings to be made in order to be effective:
At “Item open action” setting select from dropdown “related url” and choose from the next setting “Related url in new tab” either to open or not in a new tab.

Or select from “Related Url” either to open in the “Same Tab” or “New Tab”.

External link can be added on step 3 at “Uploading files” and as well as on step 4 “Text & Reorder”.
For more information please also check How to add links to your galleries support article.
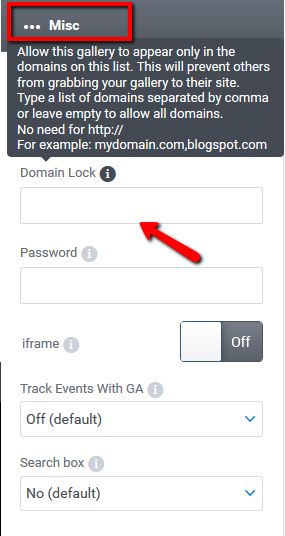
Misc settings
At “Allow download” setting you can disable download of the original files or file download in general.


At “Domain Lock” setting you are able to lock your gallery to your domain or more domains making sure no one can copy it from your site.
NOTE: Domain lock must be filled in without http://
For more information please also check How to track your galleries with Google Analytics support article.
You can enable the Google Analytics feature and get more statistics about your gallery.

You can add a Search box to your gallery.

Step 3 → Upload Media/Files
- You can add tags, caption and description to your images
- You can add external link to each file uploaded
- You can share your uploaded file using uniques share link

Step 4 → Add text / Set Caption and Description / Text & Reorder
- You can drag and reorder your files to be displayed in the order you desire.
- You can remove items from your gallery
- You can dd tags, caption and description to your images
- You can add external link to each file uploaded

NOTE: Please pay attention for the changes to be “Saved”.
You can click on “Grid view” to make the reorder easier for you.
